
Florida’s intense sun, high humidity, and pool chemicals create the perfect storm for pool tile damage. Cracked, chipped, or loose tiles aren’t just eyesores; they signal potential structural problems that can escalate quickly. This guide walks you through professional-grade DIY repair techniques tailored specifically for Florida pools, helping you restore your pool’s beauty and prevent costly water damage with the right tools, materials, and methods.
Table of Contents
- Introduction To Pool Tile Repair
- Tools And Materials Needed For Pool Tile Repair
- Step-By-Step Pool Tile Repair Process
- Common Mistakes And Troubleshooting In Pool Tile Repair
- Alternative Repair Methods And When To Choose Them
- Expected Results And Maintenance Post-Repair
- Explore Professional Pool Resurfacing Options
- FAQ
Key takeaways
| Point | Details |
|---|---|
| Surface preparation determines success | Thoroughly cleaning and drying the substrate improves adhesive bonding by up to 35%. |
| Use specialized pool adhesives | Epoxy-based products resist pool chemicals and bond effectively even underwater. |
| Respect curing times | Allow 24-48 hours for adhesive to cure before refilling to prevent tile displacement. |
| Safety gear is essential | Wearing protective equipment reduces injury risk during repair by over 70%. |
| Choose repair method wisely | Match your approach to damage severity, available time, and skill level. |
Introduction to pool tile repair
Florida’s climate punishes pool tiles relentlessly. Extreme heat cycles, tropical humidity, and constant exposure to chlorinated water accelerate tile deterioration faster than in most regions. The combination of weather and chemicals causes cracking, chipping, and loosening that compromises both aesthetics and pool integrity.
Common damage patterns include:
- Hairline cracks radiating from tile corners due to thermal expansion
- Chips along waterline tiles from pool equipment impacts
- Loose tiles caused by adhesive failure from moisture penetration
- Grout deterioration creating gaps that allow water behind tiles
Addressing these issues promptly prevents minor problems from becoming major headaches. Water infiltrating behind loose tiles can damage the pool shell, leading to expensive structural repairs. Understanding the specific type of damage you’re facing helps you select the correct repair approach and materials.
Successful tile repair requires more than slapping on some adhesive. You need to understand how Florida’s environment affects bonding, curing, and long-term durability. The techniques outlined here account for our state’s unique challenges, giving you professional-grade results without the professional price tag.
Tools and materials needed for pool tile repair
Having the right supplies before starting saves frustration and ensures quality results. Pool tile repair demands specialized materials designed to withstand constant water exposure and chemical treatment. Standard household adhesives and grout will fail quickly in pool environments.
Essential tools and materials:
- Epoxy-based pool tile adhesive: Unlike standard construction adhesive, epoxy formulations resist pool chemicals and maintain bond strength underwater. Choose products specifically labeled for submerged applications.
- Waterproof pool grout: Polymer-modified grout flexes with temperature changes and repels water, preventing the cracking and crumbling common with standard grout.
- Tile removal tools: Cold chisel, rubber mallet, and wire brush for safely removing damaged tiles and preparing surfaces.
- Safety equipment: Chemical-resistant gloves, safety glasses, and dust mask to protect against tile fragments and adhesive fumes.
- Application tools: Notched trowel for spreading adhesive, grout float for finishing, and tile spacers for alignment.
- Cleaning supplies: Pool tile cleaner, degreaser, and clean rags for surface preparation.
| Material Type | Purpose | Key Feature |
|---|---|---|
| Epoxy adhesive | Bonds replacement tiles | Chemical resistant, underwater cure |
| Waterproof grout | Seals tile joints | Polymer modified, flexible |
| Wire brush | Surface preparation | Removes old adhesive residue |
| Tile spacers | Alignment | Ensures even grout lines |
| Safety gear | Personal protection | Prevents injury from fragments |
Investing in quality materials pays dividends. Cheap adhesives might save a few dollars initially but often fail within months, forcing you to redo the entire repair. Professional-grade products designed for pool environments typically cost 20-30% more but deliver years of reliable performance. Understanding what pool tile repair entails helps you appreciate why material quality matters so much.
Pro Tip: Purchase 10-15% more tiles than needed to account for breakage during installation and to have exact matches for future repairs.
Step-by-step pool tile repair process
Methodical execution separates successful repairs from failures that need redoing in weeks. Each step builds on the previous one, creating a system that delivers professional results. Rushing or skipping steps virtually guarantees problems down the road.
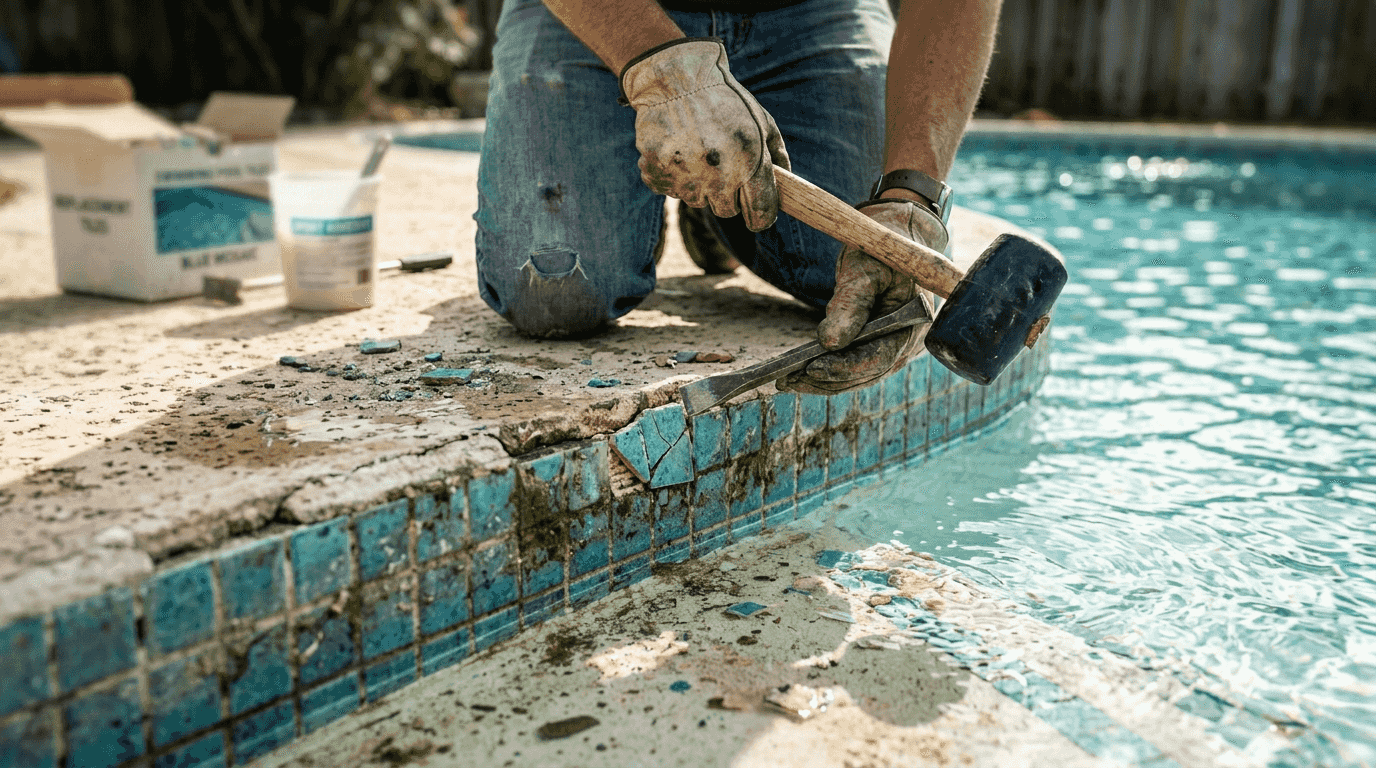
Step 1: Remove damaged tiles carefully
Use a cold chisel and rubber mallet to gently break the bond between damaged tiles and the substrate. Work from the center of each tile outward to minimize stress on surrounding tiles. Tap lightly and progressively rather than hitting hard, which can crack adjacent tiles or damage the underlying surface.
Step 2: Prepare the substrate thoroughly
This step determines repair longevity. Cleaning substrate with wire brushes boosts bonding by removing old adhesive, algae, and chemical deposits. Scrub aggressively until you expose clean, rough surface material. Follow with pool tile cleaner to eliminate oils and residues, then rinse completely. Allow the area to dry fully, which may take 24 hours in humid conditions. Applying adhesive to damp surfaces causes bonding failure. Proper pool preparation techniques ensure your repair lasts.
Step 3: Apply adhesive and set tiles
Spread epoxy adhesive evenly using a notched trowel, creating ridges that improve coverage. Press replacement tiles firmly into place with a slight twisting motion to ensure complete contact. Use tile spacers to maintain consistent gaps matching existing grout lines. Check alignment frequently as you work.
Step 4: Grout the repair area
Wait until adhesive reaches initial set (usually 2-4 hours, check manufacturer guidelines) before grouting. Mix waterproof grout to a thick peanut butter consistency. Apply with a grout float held at 45 degrees, forcing material deep into joints. Remove excess grout immediately with a damp sponge, using diagonal strokes to avoid pulling grout from joints.
Step 5: Allow proper curing time
Adhesive requires 24-48 hours to cure fully before water contact. Florida’s humidity can extend this timeline. Resist the temptation to refill early; premature water exposure weakens bonds and causes tiles to loosen within weeks. Cover the repair area to protect from rain and debris. Following proper pool surface maintenance tips prevents future damage.
| Step | Time Required | Critical Factor |
|---|---|---|
| Tile removal | 15-30 min per tile | Avoid damaging substrate |
| Surface cleaning | 45-60 minutes | Complete adhesive removal |
| Drying time | 12-24 hours | Zero moisture for bonding |
| Adhesive application | 10-15 min per tile | Even coverage, proper alignment |
| Initial cure | 2-4 hours | Before grouting |
| Full cure | 24-48 hours | Before water exposure |
Pro Tip: Test adhesive cure by pressing firmly on a tile corner. If it shifts at all, wait another 12 hours before adding water.
These techniques apply to various pool surface repairs. The same attention to preparation and curing applies whether you’re fixing tiles or following a pool plaster patching guide for other surface issues.
Common mistakes and troubleshooting in pool tile repair
Even experienced DIYers make errors that compromise repairs. Knowing what can go wrong helps you avoid these pitfalls and recognize problems early when they’re easier to fix.
Frequent errors include:
- Inadequate surface cleaning: Up to 60% of DIY failures stem from poor prep and insufficient drying. Old adhesive residue, algae, and oils prevent new adhesive from bonding properly. Spend extra time on this step.
- Ignoring humidity effects: Florida’s moisture slows curing and can prevent proper adhesive set. Work during dry weather when possible, and extend curing times during humid periods.
- Using wrong adhesive type: Construction adhesive or standard tile mastic breaks down rapidly in pool water. Only epoxy formulations designed for underwater use provide lasting bonds.
- Rushing curing time: Refilling the pool before adhesive fully cures is the fastest path to failure. Tiles may appear secure but will loosen once submerged.
- Poor tile alignment: Uneven spacing creates visual problems and stress points where grout cracks. Always use spacers and check alignment before adhesive sets.
- Skipping safety gear: Protective equipment reduces injury risk by over 70% during tile removal and adhesive work. Flying tile fragments can cause serious eye injuries.
When tiles loosen after repair, the root cause is almost always inadequate surface preparation or premature water exposure. Remove the failed tiles and start over, this time obsessing over cleaning and drying. There’s no shortcut.
“The difference between repairs that last months versus years comes down to patience during preparation and curing. Every hour you invest in proper surface prep adds months to your repair’s lifespan.”
Pro Tip: Take photos during each step, especially of substrate preparation. If problems develop later, images help diagnose what went wrong.
Manufacturer instructions aren’t suggestions. They’re tested guidelines for achieving advertised performance. Deviating from recommended mixing ratios, application thickness, or curing times voids any performance guarantees and usually leads to failure.
Alternative repair methods and when to choose them
Not every tile problem requires the full removal and replacement process. Understanding your options helps you match effort and cost to the damage severity you’re facing.
DIY repair kits for minor damage
These contain pre-mixed adhesive and color-matched grout for quick fixes. They work well for single chips or hairline cracks but lack the durability of epoxy systems. Expect 1-2 years of service before reapplication becomes necessary. Best for cosmetic issues that don’t threaten structural integrity.
Full tile replacement with epoxy
The method detailed earlier provides maximum durability and professional appearance. Required skill level is moderate, time investment is 4-6 hours including curing, but results can last 5-10 years with proper execution. Choose this approach for multiple damaged tiles or waterline repairs where appearance matters.
Professional resurfacing
When damage extends beyond a few tiles or the pool shell shows deterioration, complete resurfacing delivers best value. Professional application includes warranty coverage and addresses underlying structural issues. Understanding pool resurfacing cost factors helps you evaluate whether DIY repair or full resurfacing makes more financial sense. Proper pool renovation budgeting tips account for both immediate costs and long-term value.
| Method | Best For | Durability | Skill Level | Cost Range |
|---|---|---|---|---|
| Repair kit | 1-3 small chips | 1-2 years | Beginner | $20-50 |
| DIY replacement | 5-15 damaged tiles | 5-10 years | Intermediate | $100-300 |
| Professional repair | Extensive damage | 10+ years | N/A | $500-1500 |
| Full resurfacing | Widespread deterioration | 15-20 years | N/A | $5000-12000 |
Your decision should weigh damage extent, budget constraints, available time, and DIY comfort level. A few cracked tiles justify DIY repair. Widespread loosening or shell damage signals it’s time to call professionals.
Expected results and maintenance post-repair
Setting realistic expectations prevents disappointment and helps you recognize when repairs succeed or need attention. Properly executed tile repairs should be nearly invisible and last for years.
Typical outcomes include:
- Bond strength: Epoxy adhesives create bonds stronger than the tile itself when applied correctly. Tiles should resist moderate pressure without movement.
- Grout integrity: Waterproof grout maintains flexibility and water resistance for 5-7 years before requiring touch-ups.
- Visual appearance: Color-matched tiles and careful alignment make repairs blend seamlessly with existing surfaces.
- Curing timeline: Full adhesive cure takes 24-48 hours; grout reaches service strength in 72 hours but continues hardening for two weeks.
Ongoing maintenance extends repair life significantly:
- Clean tile surfaces weekly with soft brushes to prevent chemical and mineral buildup
- Inspect grout lines monthly for cracks or gaps that allow water penetration
- Address small grout cracks immediately with waterproof sealant before they expand
- Maintain proper water chemistry to minimize tile and grout deterioration
- Monitor repaired areas after pool shock treatments, which stress adhesive bonds
Warning signs requiring attention include tiles that sound hollow when tapped, grout that crumbles when touched, or visible gaps between tiles and substrate. Catching these early prevents one loose tile from becoming ten. Following pool maintenance after tile repair guidelines ensures your investment delivers maximum value.
Explore professional pool resurfacing options
While DIY tile repair handles isolated damage effectively, extensive deterioration or recurring problems signal deeper issues requiring professional assessment. Classic Marcite specializes in comprehensive pool renovation solutions across Orlando and Jacksonville, combining 38 years of experience with advanced materials like Pebble Tec® for lasting results.

Professional resurfacing addresses tile damage, surface deterioration, and structural concerns in a single project. Expert application ensures proper bonding, optimal curing conditions, and warranty-backed performance. When tile problems multiply or your pool shows its age, exploring pool resurfacing Florida basics helps you understand available options and expected outcomes.
Whether you need targeted pool renovation Jacksonville services or comprehensive pool repair services Orlando solutions, professional consultation identifies the most cost-effective approach for your specific situation. Sometimes the smartest DIY decision is recognizing when expert help delivers better long-term value.
FAQ
How long does it take for pool tile adhesive to cure in Florida?
Adhesive typically requires 24-48 hours for complete cure before water contact. Florida’s high humidity can extend this timeline, especially during summer months. Test cure by pressing firmly on tile corners; any movement means waiting another 12 hours. Never refill the pool until adhesive reaches full strength, regardless of how solid tiles appear.
What safety precautions should I take when repairing pool tiles?
Always wear chemical-resistant gloves, safety glasses, and a dust mask during tile removal and adhesive application. Protective equipment cuts injury risk by over 70% by preventing cuts from tile fragments and chemical exposure. Work in well-ventilated areas when using epoxy products, as fumes can cause respiratory irritation. Keep a first aid kit nearby and never work alone.
How can I fix tiles that loosen after repair?
Loosening typically results from inadequate prep or premature pool refilling. Remove failed tiles completely and inspect the substrate. If you find old adhesive residue or the surface feels smooth rather than rough, cleaning was insufficient. Scrub aggressively with a wire brush until you expose fresh, textured material. Ensure complete drying before reapplying epoxy adhesive and respect full curing times before water contact.
Can I repair pool tiles without draining the entire pool?
Yes, for tiles above the waterline or when using specialized underwater epoxy products. Lower water level 6-8 inches below the repair area to provide dry working space. Underwater adhesives bond while submerged but cost significantly more and require precise application. For best results and easiest working conditions, drain the pool if repairing multiple tiles or addressing waterline damage.
What causes pool tiles to crack in Florida?
Thermal expansion from extreme temperature swings is the primary culprit. Florida pools experience surface temperatures exceeding 95°F in summer, then cooling dramatically overnight. This constant expansion and contraction stresses tile bonds and grout. Pool chemical imbalances accelerate deterioration, as does ground settling that shifts the pool shell. Using flexible, polymer-modified grout helps tiles withstand these stresses better than rigid formulations.
