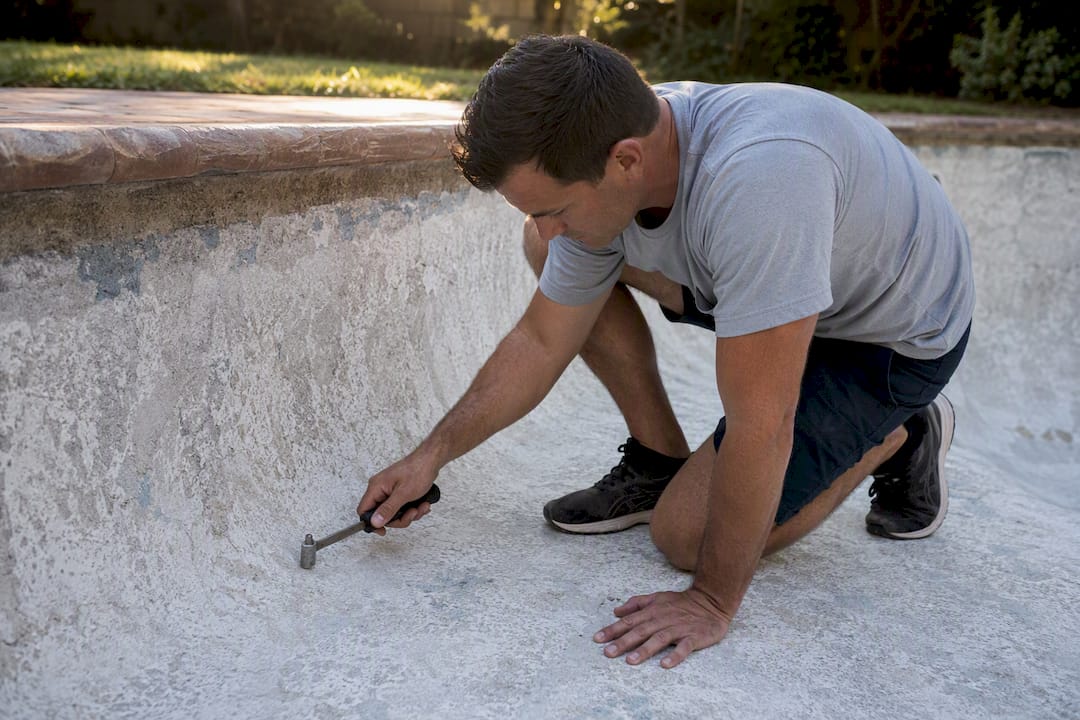
A hollow, drummy sound when you tap pool plaster almost always means the plaster has lost its bond to the shell underneath, a condition called delamination. The next move is not to panic. Map the hollow area first, then decide whether a patch will hold or the pool needs resurfacing.
TL;DR:
- Delamination typically results from poor surface preparation, application errors, or external stresses, leading to hollow spots or calcium nodules.
- Acoustic testing, such as tapping with a mallet or dragging a chain, is essential for accurately mapping hollow areas beyond visible damage.
- Patch repairs are suitable only for small, well-bonded hollow spots; large or systemic delamination requires professional assessment and possibly resurfacing.
- Proper surface preparation, including mechanical profiling and pre-wetting, is the key to preventing future delamination failures.
- Repeated patching signals the need for a full resurfacing, especially when hollow sounds span large areas or multiple zones show recurrent calcium nodules.
Table of Contents
- What Hollow Spots Plaster Problems Look and Feel Like
- Why Plaster Delaminates in the First Place
- Delamination vs. Etching, Scaling, and Structural Cracks
- Can You Patch Hollow Plaster Yourself?
- When a Patch Is Not Enough
- Common Diagnostic Mistakes Owners Make
- How Professionals Diagnose and Repair Delamination for Good
- Preventing the Next Round of Hollow Spots
- Bottom Line: Your Three-Step Decision Path
- Classic Marcite’s Approach to Delamination Repair
- Getting a Professional Inspection and Repair Quote
- Sources
What Hollow Spots Plaster Problems Look and Feel Like
Detecting delamination is mostly a listening exercise, not a guessing game. A plastic mallet or the wooden handle of a pool brush works well: tap the surface in a grid pattern and pay attention to pitch. A sharp “tick” means the plaster is still bonded to the gunite. A dull “thud” or drum roll means air or water has gotten underneath.
- Drain the area if possible, or work section by section underwater with a rubber mallet.
- Tap in overlapping rows, roughly 12 inches apart, across the whole shell.
- Mark every hollow response with a wax pencil or painter’s tape.
- Connect the marks to outline the true perimeter of the void, not just where the damage is visible.
- On decks and floors, drag a section of chain across the surface. A hollow rattle signals the same subsurface separation.
Visual clues back up what your ears pick up. Watch for calcium nodules, rough or mottled patches, tenting, small pop-offs, and hairline cracks radiating from a center point.
Pro Tip: Sound the pool when it is cool and the surface is dry if you can. Heat and standing water dull the acoustic difference between bonded and hollow plaster, which makes borderline spots harder to catch.
Why Plaster Delaminates in the First Place
Delamination rarely happens for one isolated reason. It is usually the result of a chain of shortcuts taken months or years before the hollow sound ever showed up.
- Surface-prep failures. Dust, oil film, algae, or a substrate that was never properly pre-wet or acid-etched prevents the chemical and mechanical bond that plaster needs to grip the gunite.
- Application mistakes. Over-troweling closes the surface too tightly, excessive calcium chloride accelerates set time unevenly, and rushed mixing or curing leaves weak, porous zones.
- External forces. Ground shift, settling, and general age-related wear stress the bond line even on jobs that were installed correctly.
Once plaster separates from the shell, a thin gap forms that fills with water. That trapped, supersaturated water is exactly what produces calcium nodules later, so the nodules are a downstream symptom, not the original problem.
Delamination vs. Etching, Scaling, and Structural Cracks
Not every plaster complaint is a hollow spot. Telling these apart determines which fix you actually need.
- Etching feels rough or sandy to the touch, with a worn, dull texture. It sounds solid when tapped; the plaster is thinning chemically, not lifting.
- Scaling or spalling shows up as surface flakes or small chunks breaking away, often tied to calcium buildup or freeze/thaw stress. It can occur with or without a hollow underneath.
- Delamination is defined by that hollow, drummy sound, sometimes paired with nodules or tenting.
- Structural cracks run in a line, often wider than a hairline, and may extend into the gunite itself rather than just the finish coat.
Run your hand over the surface, then sound it. Rough texture with a solid tap points to etching. A hollow tap, with or without visible nodules, points to delamination.
Can You Patch Hollow Plaster Yourself?
A small, isolated hollow spot with a firm, well-bonded perimeter is a reasonable DIY project. Anything larger, or anything near a light niche, main drain, or structural joint, is not.
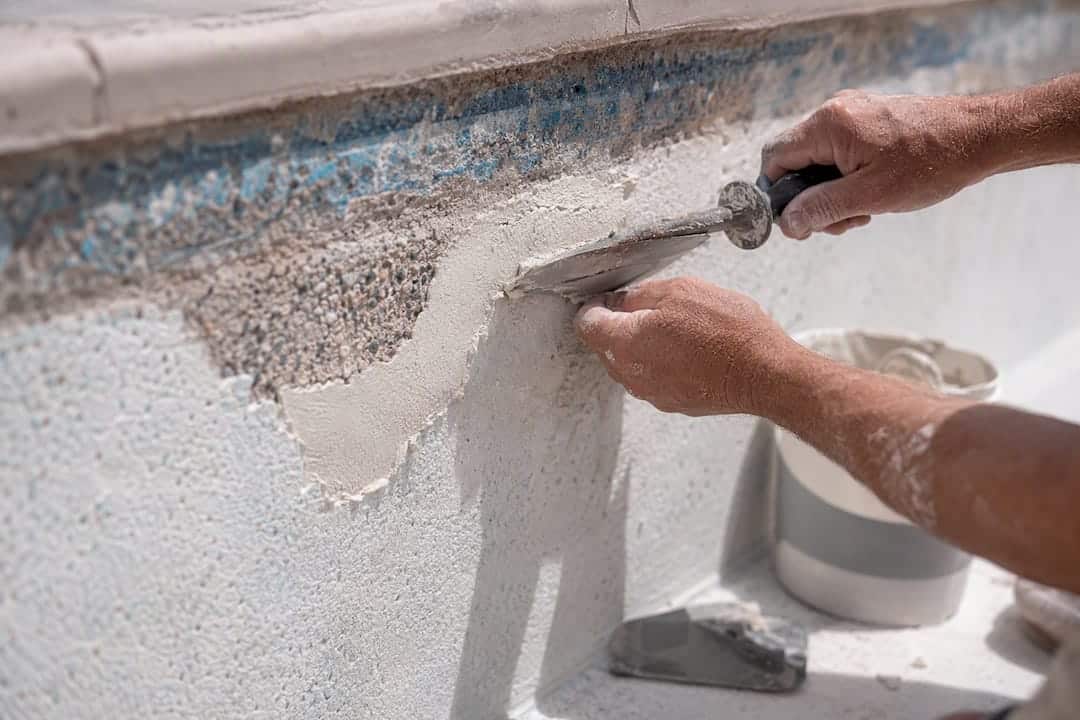
- Map and mark the hollow zone by sounding, extending your marks a few inches past where the sound changes.
- Chip out the loose plaster down to sound, solid gunite using a cold chisel or small hammer drill.
- Undercut or dovetail the edges of the cavity so the patch has a mechanical key instead of a feathered, flat edge.
- Apply a bond coat rated for underwater or damp application.
- Pack the repair mortar in firmly, working from the edges toward the center to avoid trapping air.
- Cure per the product instructions, then monitor the spot for a full season before you consider it settled.
For active leaks, hydraulic cement sets fast enough to stop water while you work. Polymer-modified repair mortars give a stronger, longer-lasting bond for dry patches. Epoxy putties are fine for a temporary stop but should not be treated as a final repair.
Pro Tip: The single biggest DIY mistake is feathering the patch edge flush with the surrounding plaster instead of undercutting it. A feathered edge has nothing to grip, and the patch pops loose within a season.
When a Patch Is Not Enough
Patching makes sense for a contained problem. It stops making sense once the failure is spread out or keeps coming back.
- More than a substantial portion of the surface tests hollow.
- You have already patched the same general area two or three times.
- Multiple calcium nodules keep appearing in different spots rather than one location.
- Hollow sounds show up on both walls and floor, suggesting a shell-wide bond failure rather than a local defect.
At that point, repeated patching becomes a losing bet. Each patch costs money and labor, and if the bond failure is systemic, a fresh patch next to an old one usually fails on the same timeline. The practical next step is a professional assessment, a couple of comparative estimates, and a decision on whether to replaster in kind or upgrade the finish while the shell is already opened up.
Common Diagnostic Mistakes Owners Make
A few recurring habits cause owners to misdiagnose or under-treat delamination.
- Scraping off a calcium nodule and repainting the spot without ever checking whether the plaster underneath is still bonded.
- Leaning entirely on water balance and chemistry logs while skipping acoustic testing altogether.
- Assuming the visible damage is the whole problem, when acoustic testing routinely finds hollow zones far larger than what shows on the surface.
- Treating an underwater hydraulic cement plug as a permanent fix rather than a stopgap.
Pro Tip: If you find one nodule, sound the surrounding six inches in every direction before you touch it. Nodules cluster near active voids more often than they appear in isolation.
How Professionals Diagnose and Repair Delamination for Good
Contractors lean on the same acoustic principle you use at home, just with more rigor. Grid mapping across the entire shell, chain-drag testing on decks and floors, and occasional core checks on ambiguous readings let a crew define the exact boundary of a void before cutting into anything.
The standard professional repair sequence looks like this:
- Remove all loose and hollow plaster back to sound, solid gunite.
- Mechanically profile the exposed substrate to create real physical tooth for the new material to grip.
- Acid-etch or otherwise clean the profiled surface to remove dust and laitance.
- Apply a polymer-modified bond coat or scratch coat across the prepped area.
- Reapply the finish, either matching plaster or an upgraded system like Pebble Tec®.
Material specs matter here. Patch compounds should reach a minimum compressive strength of about 3,500 psi at 28 days to hold up alongside the original structure. Anything weaker becomes the next weak point.
Call a professional when hollow sound spans a large portion of the shell, when you see pop-offs or exposed rebar, or when you want the repair to carry a warranty rather than a hopeful guess. Underwater patch jobs stop leaks temporarily but don’t rebuild the mechanical bond that a profiled, bonded repair provides.
Preventing the Next Round of Hollow Spots
Most delamination traces back to shortcuts during the original application, which means most of it is preventable on the next job.
- Insist on full mechanical profiling and pre-wetting of the substrate before plaster or any bond coat goes on. Proper surface prep and bonding technique is the single biggest lever against future failure.
- Skip shortcuts on mix ratios, troweling timing, and cure duration. Filling the pool before the plaster has properly cured is a common source of soft spots.
- Keep water chemistry balanced, brush regularly, and sound the whole shell once a year so a new hollow spot gets caught small.
- If longevity is the priority, consider a more durable finish system instead of a standard plaster reapplication.
Bottom Line: Your Three-Step Decision Path
Sound the surface, map every hollow zone past its visible edge, then size the problem. A dinner-plate-sized hollow with a solid perimeter is a patch job. Hollow sound across a large share of the walls or floor, or repeat nodules in multiple spots, means it is time to call a professional and plan for resurfacing rather than another round of patches.

Classic Marcite’s Approach to Delamination Repair
Classic Marcite has resurfaced over 100,000 pools since 1988, which means the crews have chipped into more failed bond lines than most owners will ever see. Repairs rely on mechanical substrate profiling and polymer-modified bond coats, the same sequence outlined above, followed by a finish choice that fits the pool’s use, whether that is traditional plaster or Pebble Tec®, where the company is the largest applicator in Central Florida.
— Results
Getting a Professional Inspection and Repair Quote
If your sounding test turned up more hollow area than you expected, the smarter move is often a professional inspection rather than a string of patches that may not hold. Classic Marcite offers accurate acoustic mapping, durable bond coat application backed by decades of repair experience, and finish options ranging from standard plaster to Pebble Tec® for owners who want a longer-lasting surface.

Whether the fix is a targeted patch or a full pool resurfacing job, an accurate diagnosis up front saves money down the line. Schedule a free inspection with Classic Marcite to get a straight answer on whether your pool needs a patch or a complete resurface, and get a written estimate before any work begins.