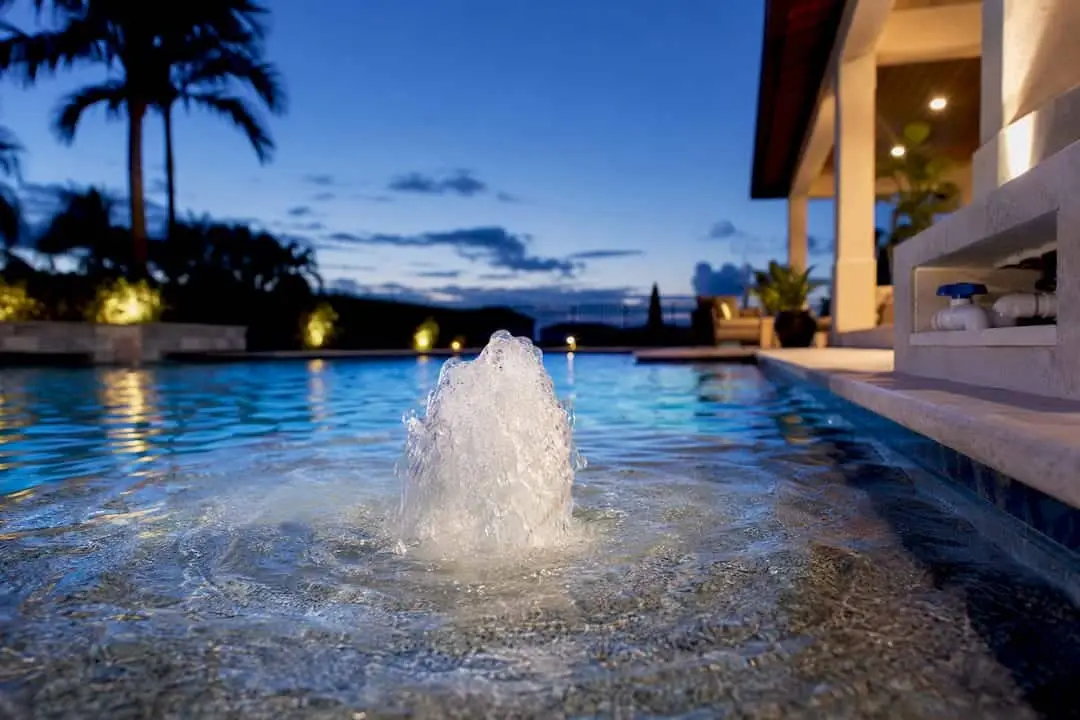
Bubblers are worth adding when you have a tanning ledge, sun shelf, or beach entry and want ambient sound plus gentle circulation. Budget a moderate installation cost per bubbler, and treat retrofits as a job for a licensed pool contractor, not a weekend project. New construction or a full remodel is the cheaper time to add them. Read on for the cost breakdown and retrofit checklist before you call anyone.
TL;DR:
- Installing bubblers during new construction or a full remodel significantly lowers total costs compared to retrofitting an existing pool.
- Retrofits can cost between $1,000 and $2,500 per unit due to core-drilling, trenching, and patching, with lighting and independent pumps increasing expenses.
- Proper placement, control valves, and shell compatibility are critical to prevent leaks, structural issues, and ensure effective water circulation.
- Core-drilling for retrofits must be done precisely by experienced professionals to avoid long-term leaks and damage, especially on fiberglass or vinyl pools.
- Combining bubbler installation with remodeling projects is more cost-effective and coordinated, especially when integrating electrical and shell work upfront.
Table of Contents
- What Pool Bubblers Add to a Pool
- What Do Pool Bubblers Cost Installed?
- Can You Add Bubblers to an Existing Pool?
- What Does a Bubbler Installation Actually Require?
- How Should You Place Bubblers on Your Tanning Ledge?
- Weighing the Pros, Cons, and Upkeep
- Should You Hire a Pro or Try This Yourself?
- Why Shell Expertise Matters for This Kind of Work
- Air Bubblers vs. Jet Bubblers: What’s the Difference?
- Do Bubblers Work with Any Pool Surface?
- What Safety Precautions Apply to Bubbler Installation?
- How Do Bubblers Affect Filtration and Water Chemistry?
- Ready to Add Bubblers to Your Pool?
- A Remodeler’s Take on Timing This Right
- Sources
What Pool Bubblers Add to a Pool
A bubbler is a small fixture set into the pool floor or a raised feature wall that pushes a mix of air and water straight up, creating a soft, foaming column instead of a jet spray. The effect sits somewhere between a fountain and a whirlpool: visible motion, a low bubbling sound, and enough turbulence to keep water moving without disturbing swimmers.
Most bubblers show up in one of a handful of spots. Tanning ledges and sun shelves, typically 6 to 18 inches deep, are the most common placement because the shallow water shows off the bubble column and stays comfortable to sit in. Beach entries, pool steps, and raised feature walls are the other frequent choices.
The appeal goes beyond looks. Homeowners add bubblers for a few concrete reasons:
- Circulation: moving water in shallow zones helps distribute chemicals and reduces the stagnant spots where algae tends to take hold.
- Ambiance: the sound and motion give a still ledge some life, especially near seating or a fire feature.
- Cooling: shallow water heats up fast in Florida sun, and a bubbler’s mixing action pulls in slightly cooler water from below.
- Kid-friendly play: the shallow depth and gentle bubbling make tanning ledges a natural spot for toddlers to splash safely.
LED-lit bubblers have become the most requested upgrade. They turn a daytime feature into a nighttime one, glowing through the bubble column once the sun goes down.
What Do Pool Bubblers Cost Installed?
Fixture prices alone are deceptively low, which is where a lot of homeowners get surprised by their first quote. A bare bubbler fixture can cost modestly, but the actual total including labor, plumbing, and wiring is higher.
Pro Tip: Ask every contractor for a fully installed price, not a fixture price. A quote that only lists the part number is a red flag, not a bargain.
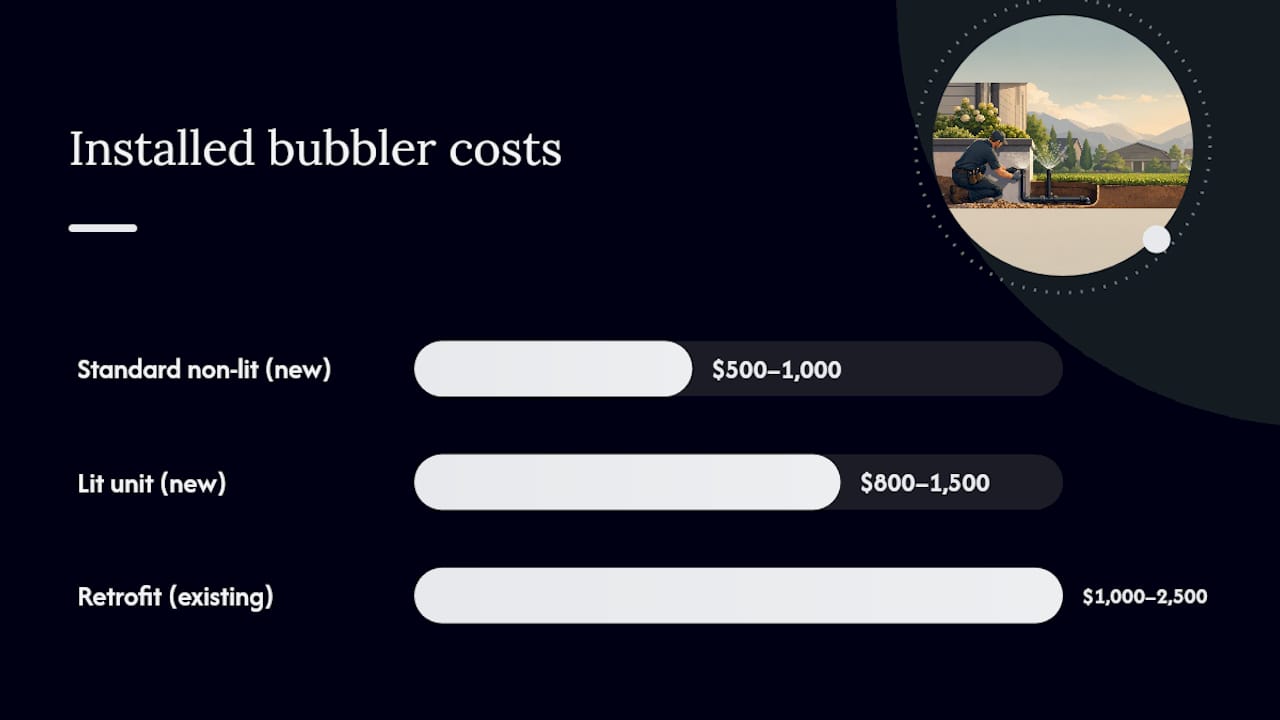
Installed costs commonly land in a much wider range depending on complexity:
- Standard non-lit bubbler, new construction: roughly $500 to $1,000 installed, since plumbing runs alongside other new lines.
- Lit bubbler, new construction: often $800 to $1,500+, once you add conduit, a transformer, and sealing work.
- Retrofit into an existing pool: frequently $1,000 to $2,500 or more per unit, driven by core-drilling, trenching, and patching an already-finished shell.
Typical Installed Range: Most homeowners should expect to pay several hundred to over $1,000 per bubbler once installation is factored in, with lighted units and retrofits pushing toward the higher end of that range.
A few specific factors push the price up. LED lighting adds a transformer, conduit run, and inspection step. A separate dedicated pump for the bubbler line, rather than tapping the existing return, adds equipment and labor cost. Trenching for new PVC, diverter valves to control flow, and any required permits all stack onto the labor bill. Operating costs, by contrast, are usually minor. A bubbler pump draws modest power, and there’s no meaningful ongoing chemical cost tied to running one. The real expense is almost entirely in getting the plumbing, electrical, and shell work done correctly the first time.
Can You Add Bubblers to an Existing Pool?
Yes, but retrofitting is meaningfully harder and pricier than building bubblers in from the start. If you’re planning new construction, tell your builder now. It’s the cheapest window you’ll ever have to add this feature, since the shell, plumbing, and equipment pad are all still open.
Retrofitting into a finished pool involves a specific sequence of steps:
- Site survey and layout. A contractor marks bubbler locations on the tanning ledge or shelf, checking shell thickness and existing plumbing runs.
- Water lowering. The pool is partially drained around the work zone so the shell can be safely cut without flooding the work area.
- Core drilling. Technicians cut through the finished surface and shell to create an opening for the fixture body, which is one reason this isn’t a DIY-friendly project.
- Trenching and piping. Dedicated PVC lines run from each bubbler back to the equipment pad, often requiring trenching through the deck or nearby landscaping.
- Backfill and patch. Once plumbing and any conduit are in place, the openings are sealed and patched to match the surrounding finish.
- Cure time and refill. Patched areas need time to cure before the pool refills, adding days to the project timeline beyond the actual labor.
Retrofitting isn’t a good fit for every pool. A shallow shelf with limited depth to run new lines, a shell that’s already thin or showing wear, or a plumbing layout that’s hard to access can all make retrofitting impractical or unusually expensive. In those cases, pairing the bubbler install with a broader pool renovation often makes more financial sense than tackling it as a standalone add-on.
What Does a Bubbler Installation Actually Require?
Every bubbler needs its own dedicated supply line running back to the equipment pad, along with a diverter or balancing valve so you can control bubble height and flow independently of the rest of the system. Without that valve, you’re stuck with whatever pressure the main pump happens to deliver, which usually looks wrong.
You have two basic plumbing options. Tapping into the existing return line is cheaper but limits your control over pressure, since the bubbler shares flow with everything else on that line. A separate dedicated pump, wired and plumbed just for the bubbler, is recommended whenever you want independent control or plan to run multiple units.
Lighting adds a separate layer of requirements:
- A low-voltage transformer, typically installed at the equipment pad rather than poolside.
- Waterproof conduit running from the transformer to each light body.
- GFCI protection on the circuit, which most local codes require for any pool-adjacent electrical work.
- A permit and inspection in most jurisdictions once lighting is added, since it touches both electrical and pool safety code.
Managing water pressure correctly matters just as much as the wiring. Understanding how pressure regulation works helps explain why a poorly balanced diverter valve leads to bubblers that either barely bubble or spray more aggressively than intended.
Core-drilling and shell penetration are the steps where an inexperienced installer causes long-term problems. Every opening cut into the shell has to be sealed with the correct patch material and workflow, or you end up with a slow leak that’s expensive to trace later. This is the single biggest reason to hire a contractor with real pool construction experience rather than a general handyman.
How Should You Place Bubblers on Your Tanning Ledge?
Layout matters more than most homeowners expect. A single bubbler off to one side of a tanning ledge can look like an afterthought, while three or four spaced evenly across the shelf read as an intentional feature.
Common layout patterns include:
- Single focal bubbler: placed at the center or a corner of a small shelf, best for tight budgets or compact ledges.
- Row across the ledge: three to five bubblers spaced evenly, the most popular layout for larger sun shelves.
- Clustered feature wall: bubblers grouped tightly on a raised wall or step, creating a denser, more dramatic effect than ledge placement.
As a rule of thumb, keep bubblers far enough apart that people can still comfortably lie down or sit between them, usually a minimum of 18 to 24 inches of clear space per person. Placing them too close to the ledge’s edge also risks bubbling water off the shelf entirely.
If you’re adding lighting, plan the electrical layout at the same time as the plumbing. Clustered bubblers paired with LED lighting create a strong nighttime visual, but only when the conduit runs are planned before any concrete or shell work happens, not added as an afterthought later.
Weighing the Pros, Cons, and Upkeep
Bubblers earn their keep on ambiance. The combination of sound and visible motion turns a plain tanning ledge into the focal point of a backyard, and the modest circulation boost helps keep shallow water from stagnating. Cooling is real too, though subtle. On a 95 degree Florida afternoon, a bubbling shelf feels noticeably less stagnant than still water sitting in direct sun.
The trade-offs are mostly upfront. Retrofit labor is the biggest cost driver, and a poorly sealed core-drill can leak for months before anyone traces the source. Every additional line and valve is one more thing that can eventually need service, and lighted bubblers add electrical complexity that non-lit units simply don’t have.
Routine upkeep is light but shouldn’t be skipped:
- Clear leaves and debris from around bubbler openings so flow isn’t restricted.
- Inspect valve seals and fittings each season for slow leaks or mineral buildup.
- Test lighting and the transformer at the start of pool season, before guests are over.
- In climates with hard freezes, winterize bubbler lines the same way you would any other plumbing run, draining them to prevent cracked pipe.
Should You Hire a Pro or Try This Yourself?
Core-drilling, electrical work, and watertight sealing all fall firmly on the “hire a professional” side of the ledger. DIY is reasonable only for surface-level accessories, like a battery-powered decorative fountain that sits on top of an existing ledge rather than penetrating the shell.
When vetting a contractor, a few questions separate a solid bid from a risky one:
- Ask who pulls the permit. A licensed contractor should handle permitting for any electrical or shell-penetrating work, not leave it to you.
- Ask about warranty coverage. Get in writing what’s covered if a bubbler leaks or a light fails within the first year or two.
- Ask to see a gallery of similar installs. A contractor who’s done tanning ledge bubbler retrofits before should have photos to prove it.
- Ask for a firm, itemized scope. The bid should separate plumbing, electrical, patching, and fixture costs, not bundle everything into one vague number.
Red flags include a contractor who quotes only the fixture price with no mention of labor, refuses to specify a warranty, or can’t describe how they’ll seal the core-drilled opening. Any of those should send you looking for another bid.
Why Shell Expertise Matters for This Kind of Work
Bubblers only work as well as the shell they’re built into. Classicmarcite has resurfaced more than 100,000 pools since 1988 and stands as the largest Pebble Tec® applicator in Central Florida, which means shell integrity and coordinated plumbing and electrical work aren’t guesswork. A qualified remodeler should walk your site, scope the full job, show a real project gallery, and back the work with a warranty, not just hand you a fixture price.
Air Bubblers vs. Jet Bubblers: What’s the Difference?
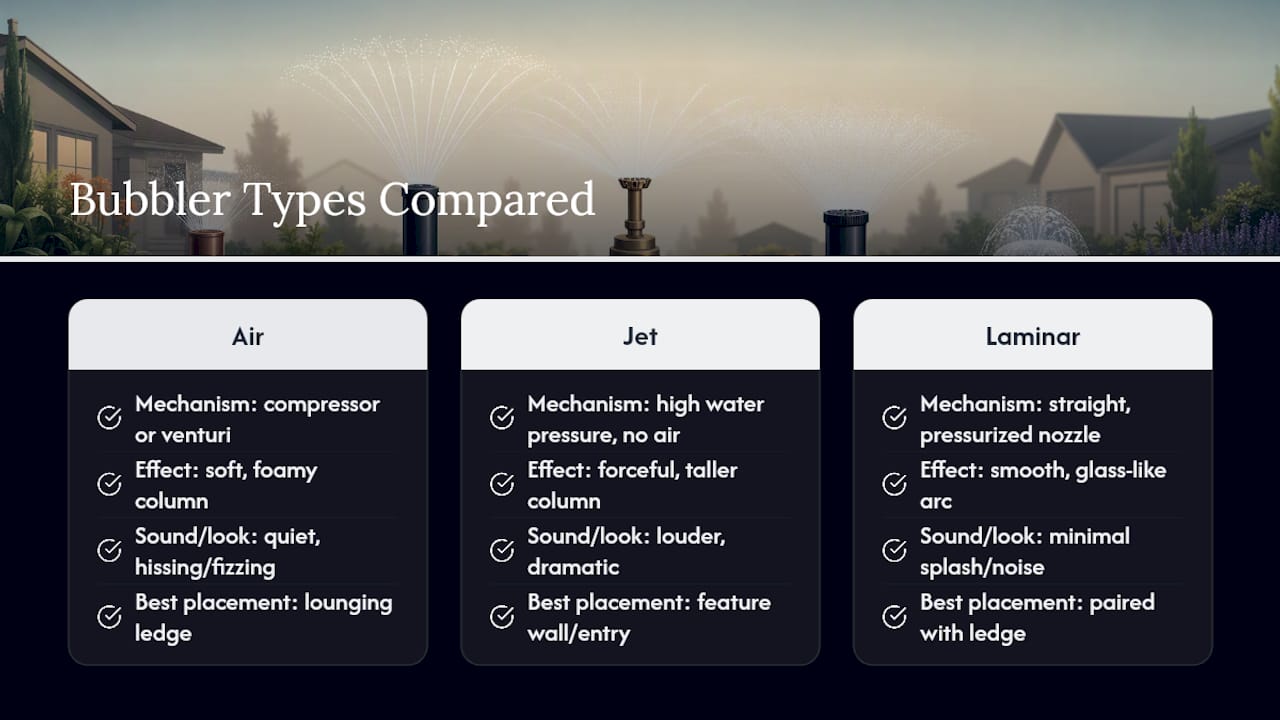
Not all bubblers create the same effect, and the distinction matters when you’re picking a style for your ledge. Air bubblers pull ambient air through a small compressor or venturi, mixing it into the water stream to create a soft, foamy column with a gentle hissing or fizzing sound. They’re the quieter, more subtle option, well suited to a relaxed lounge area where conversation matters more than spectacle.
Jet bubblers, by contrast, use higher water pressure without the added air injection, producing a more forceful, visible column that pushes water noticeably higher above the surface. They read as more dramatic and are often chosen for feature walls or focal points rather than seating areas, since the stronger flow can feel like too much right next to where people are lounging.
There’s also a middle category sometimes called deck jets or laminar bubblers, which shoot a smooth, glass-like arc of water rather than a foaming column. These work well paired with tanning ledge bubblers as a layered water feature, giving you motion at two different heights and intensities.
The choice usually comes down to where the bubbler sits. A ledge meant for lounging benefits from the quieter air-bubbler style, while a feature wall or entry statement piece can handle the stronger jet version without disrupting anyone’s relaxation. Mixing both types across a single pool design is common in larger remodels, giving each zone its own character instead of one uniform effect throughout.
Do Bubblers Work with Any Pool Surface?
Bubbler compatibility depends more on the shell material and structure than on the finish sitting on top of it. Gunite and shotcrete shells, the most common construction type for custom in-ground pools, take core-drilling and patching well because the material is thick and can be repaired with matching cementitious patch compounds. Fiberglass shells are a different story: they’re thinner and more rigid, so cutting into one for a retrofit carries more risk of stress cracking if it’s not handled by someone experienced with that specific shell type.
Vinyl liner pools present their own complication. Since the water-tight barrier is the liner itself rather than the shell, adding a bubbler usually means working underneath or around the liner during a liner replacement, rather than drilling through it directly. This makes vinyl liner retrofits more disruptive timing-wise, since the work often needs to align with a liner change already on the calendar.
The finish on top, whether that’s marcite plaster, Pebble Tec®, or tile, doesn’t change whether a bubbler can be installed. It changes how the patch job around the fixture gets blended back in visually. A textured pebble finish tends to hide a patch seam better than a smooth plaster surface, which is one more reason resurfacing and bubbler installation pair well as a combined project rather than two separate jobs years apart.
What Safety Precautions Apply to Bubbler Installation?
Electrical safety is the area where corners can’t be cut, especially with lighted bubblers sitting inches from water. Every lighted unit needs GFCI protection on its circuit, and the low-voltage transformer that powers the light body should be installed at the equipment pad, away from the water’s edge, not tucked into a poolside enclosure. Conduit runs need to be rated for wet or underground use, and any splice or connection point has to be sealed against water intrusion.
Structural safety matters just as much during installation. Core-drilling into a shell that hasn’t been properly assessed can weaken the surrounding structure if the contractor doesn’t know how much material can safely be removed. This is part of why shell penetrations need correct sealing and patch technique, not just a quick fix, to prevent both leaks and long-term structural weakness around the opening.
There’s also a practical safety angle for families with young kids. Bubblers on a tanning ledge are generally a safe, shallow play feature, but a jet-style bubbler with strong upward force placed too close to where toddlers stand can be startling or even knock a small child off balance. Positioning stronger jet bubblers away from the shallowest, most trafficked zones avoids that problem without giving up the feature altogether.
How Do Bubblers Affect Filtration and Water Chemistry?
Bubblers don’t replace your filtration system, but they do interact with it in a useful way. The turbulence they create in shallow water helps move chemically treated water through zones that would otherwise sit relatively still, which is part of why they help reduce dead spots where algae can start to grow. A tanning ledge without any circulation feature is one of the more common spots for early algae blooms, simply because water there barely moves compared to the deep end near the main returns.
That said, a bubbler pulling from a separate dedicated pump doesn’t automatically improve overall filtration turnover, since it’s a distinct circuit from your main filter and pump system. It’s best understood as a localized circulation aid rather than a filtration upgrade. Your main pump and filter still handle the bulk of the water turnover and chemical distribution; the bubbler just prevents the shallow end from becoming a stagnant pocket that the main system struggles to reach efficiently.
Chemical balance itself isn’t directly affected by adding a bubbler. You won’t need to adjust your chlorine or pH routine because of the fixture. The main practical consideration is aeration: bubblers introduce more air into the water than a still surface would, and heavily aerated water can very slightly affect chlorine off-gassing in a small, enclosed area. In practice, this effect is minor enough that most pool owners never notice a measurable difference in their testing routine.
Ready to Add Bubblers to Your Pool?
If a tanning ledge bubbler retrofit sounds like a bigger project than you expected, that’s because it usually is once plumbing, electrical, and shell work are all accounted for. Classicmarcite folds bubbler installation directly into its resurfacing and remodeling projects, coordinating the plumbing, electrical, and lighting work alongside the shell finish so you’re not paying to reopen a freshly resurfaced pool a year later.
That kind of integrated approach is the real advantage over hiring separate trades piecemeal: one team handles the core-drilling, the diverter valves, and the surface finish together, with the seal and patch work matched to the same material going back down. If your pool is already due for a resurface, browse the remodeling process to see how bubblers and other features fit into that timeline, then request a free on-site estimate to get a firm, itemized quote for your specific ledge or shelf.
A Remodeler’s Take on Timing This Right
If you’re already resurfacing or remodeling, add bubblers now. Doing it later almost always costs more once the shell is finished and sealed. Get an on-site assessment before you commit to a layout. It’s the only way to know what your shelf can actually support.
— Results
