
TL;DR:
- Restoring faded pool tiles involves diagnosing damage correctly and using appropriate cleaning methods to target surface buildup. Maintaining proper water chemistry, especially pH and alkalinity levels, is essential to prevent recurring scale and prolong tile life. For extensive damage or substrate failure, professional restoration techniques like glass bead blasting are recommended over DIY solutions.
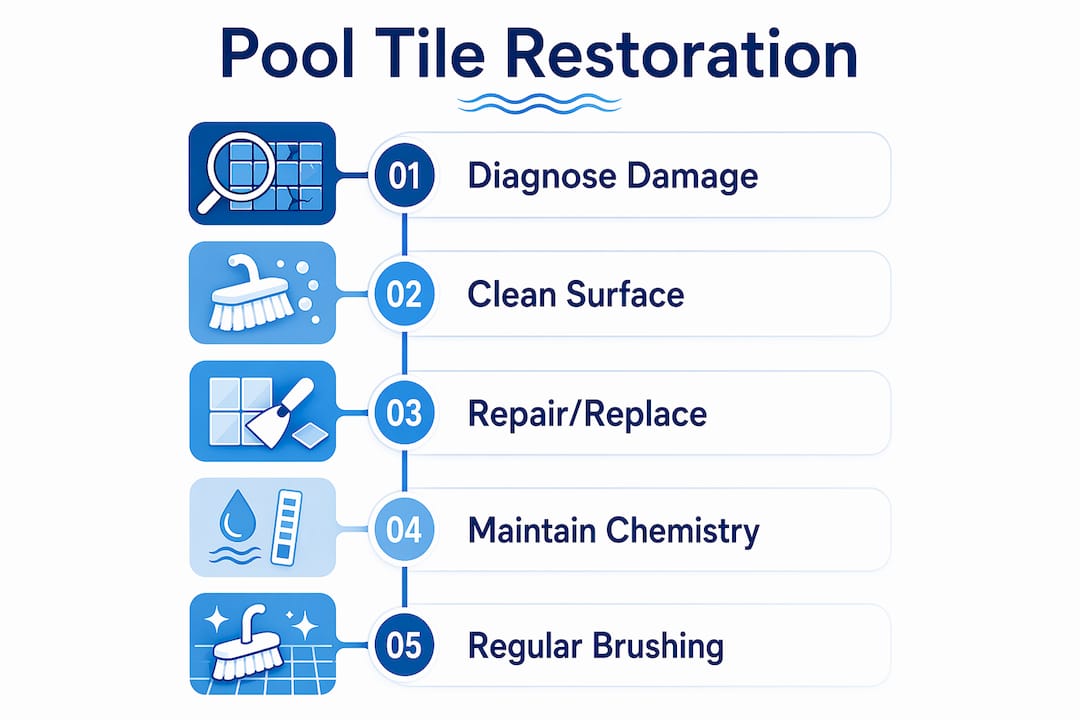
Restoring faded pool tiles is achievable through targeted cleaning, timely repairs, and consistent water chemistry management. In Florida’s hard water conditions, calcium scale is the leading cause of tile discoloration, forming white chalky deposits when water evaporates and leaves mineral residue behind. The good news: removing mineral scale usually prevents replacement entirely. Whether you use a vinegar solution, baking soda paste, or a commercial cleaner, the right approach depends on what is actually causing the fade. This guide covers pool tile restoration from diagnosis through prevention.
How to restore faded pool tiles: diagnosing the damage first
Before you scrub a single tile, you need to know what you are dealing with. The industry term for this process is tile condition assessment, and skipping it is the most common reason restoration efforts fail or need repeating within a season.
Fading and discoloration fall into four distinct categories, each requiring a different fix:
- Calcium scale deposits. White or gray chalky buildup along the waterline. High pH or alkalinity causes calcium carbonate to bond to tile surfaces. This is surface-level and fully removable with the right cleaner.
- Algae and organic staining. Green, black, or brown discoloration caused by algae growth or tannin deposits. Usually responds to brushing and algaecide treatment.
- Glaze wear. The protective glaze on ceramic or porcelain tiles erodes over years of chemical exposure and UV radiation. Once the glaze is gone, the tile surface becomes porous and stains more easily. Cleaning helps but cannot reverse glaze loss.
- Substrate or grout failure. Cracked grout, hollow-sounding tiles, or tiles that shift when pressed indicate that the bonding layer beneath has failed. Cleaning alone will not fix this. Proper substrate prep is required before any new tile can hold.
The scratch test is a fast field diagnostic. Drag a plastic scraper across a discolored area. If material comes off, you are dealing with surface buildup. If the tile surface itself looks dull or pitted after cleaning, glaze wear is the issue. Tap tiles gently with a coin. A hollow sound means the substrate bond has failed and the tile needs resetting, not just cleaning.
Understanding whether fading is surface staining or deeper glaze and substrate damage is the single most important step in pool tile restoration. Getting this wrong wastes time and money.
What cleaning methods actually work for pool tile buildup
Once you confirm the damage is surface-level, cleaning is straightforward. The method depends on the severity and type of buildup.
Step-by-step cleaning process
- Lower the water level below the tile line if you are targeting heavy waterline scale. This gives you dry access to the full deposit.
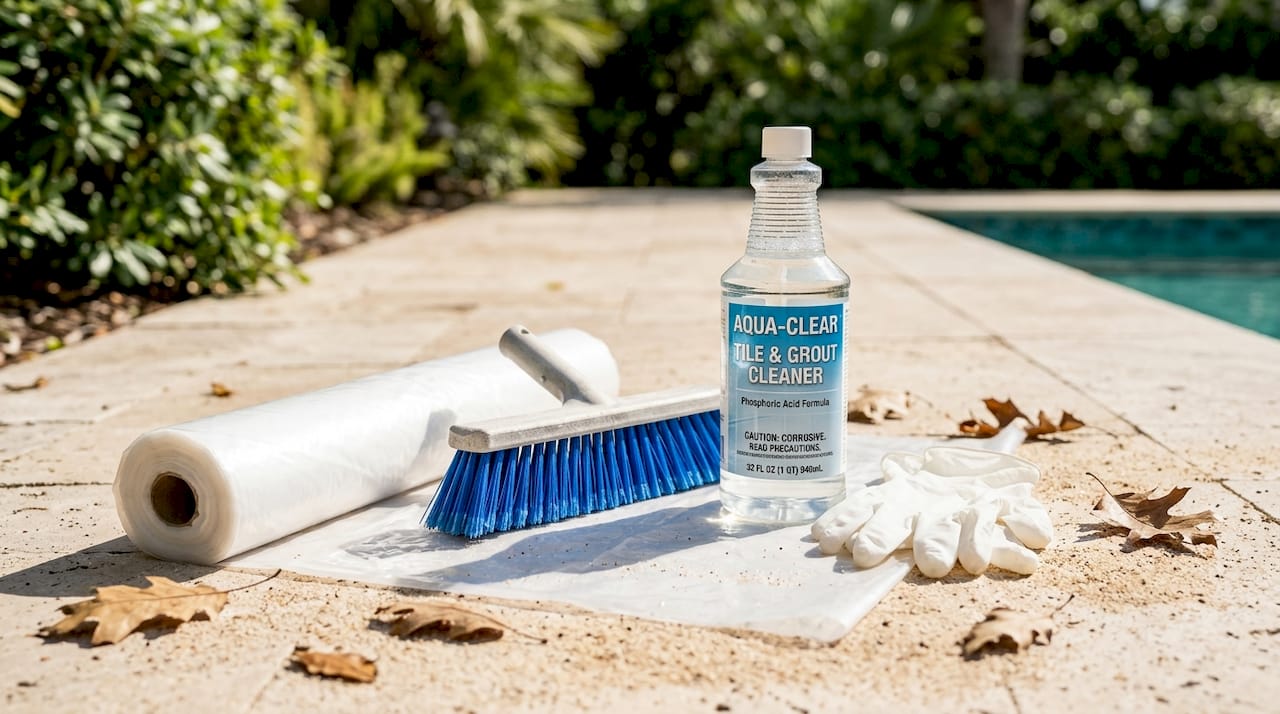
- Apply your cleaning agent. For light scale, a 1:1 white vinegar and water solution works well. Apply it directly to the tile, let it sit for five minutes, then scrub with a nylon brush. For heavier deposits, make a thick paste from baking soda and water. The mild abrasive action lifts calcium without scratching most tile glazes.
- Use a pumice stone for stubborn scale. Keep the pumice wet at all times and use light circular pressure. Pumice is safe on plaster and most ceramic tiles but can scratch glass tiles, so test a small area first.
- Try a melamine foam sponge (such as a Magic Eraser) for moderate staining on smooth tile surfaces. These work through micro-abrasion and require no chemicals.
- Rinse thoroughly after cleaning. Residual acid from vinegar-based cleaners can affect pool pH if large quantities wash into the water.
- Retest pool chemistry after any cleaning session involving commercial acid-based products.
For commercial cleaners, products formulated with muriatic acid or phosphoric acid are the most effective on calcium carbonate scale. Always follow the manufacturer’s dilution instructions and wear gloves and eye protection.
Pro Tip: Five minutes of weekly brushing along the waterline saves hours of scrubbing later. Calcium that has not yet hardened wipes off with a standard pool brush. Once it mineralizes and bonds to the tile, you need acid or abrasive tools.
Deep cleaning every three to six months, combined with weekly brushing, prevents buildup from hardening into the kind of scale that requires professional intervention. This is the most cost-effective pool tile maintenance tip available.
When should you repair or replace pool tiles?
Cleaning handles surface issues. Structural problems require a different approach entirely. Here is how to work through a tile repair correctly.
Removing and replacing damaged tiles
- Score the grout lines around the damaged tile using a grout saw or oscillating tool. Remove all grout from the perimeter before attempting to lift the tile.
- Chisel out the tile carefully. Work from the center outward using a cold chisel and hammer. Avoid prying from the edges, which can damage adjacent tiles.
- Inspect and prepare the substrate. Remove all old adhesive and smooth the surface. Any cracks or soft spots in the substrate must be repaired before setting new tile. Tile durability depends directly on the condition of the surface beneath it.
- Apply a pool-grade epoxy adhesive or thinset mortar rated for submerged applications. Standard tile adhesives fail underwater.
- Set the new tile and press firmly. Use tile spacers to maintain consistent grout lines.
- Grout with a waterproof, pool-grade grout. Standard grout absorbs water and deteriorates quickly in a pool environment.
- Seal the grout once cured. A penetrating grout sealer blocks water infiltration and significantly extends grout life.
Signs that professional help or full resurfacing is the right call include:
- More than 20% of tiles are loose or cracked
- The substrate shows widespread delamination or cracking
- Fading extends beyond the tile line to the pool interior finish
- Previous repairs have failed repeatedly in the same areas
When fading extends to the pool interior, the resurfacing workflow includes full inspection, draining, surface preparation, and applying a new finish. That is beyond DIY territory. You can learn more about deciding between restoration and new tile based on tile and substrate condition.
How does pool chemistry prevent tile fading?
Water chemistry is the most overlooked factor in pool tile maintenance. Tiles that are cleaned and repaired perfectly will fade again within months if the chemistry is wrong.
The ideal ranges for tile preservation are:
| Parameter | Target Range | Why It Matters |
|---|---|---|
| pH | 7.4 to 7.6 | High pH causes calcium to precipitate onto tile surfaces |
| Total alkalinity | 80 to 120 ppm | Stabilizes pH and reduces scale formation |
| Calcium hardness | 200 to 400 ppm | Low levels cause water to leach calcium from grout and plaster |
When pH climbs above 7.8, calcium carbonate becomes less soluble and deposits onto the nearest surface, which is usually your tile. This is why pools in Florida, where tap water is naturally hard, see faster tile scaling than pools in regions with softer water.
Test your water at least once a week during swim season and once every two weeks in winter. Use a reliable test kit such as the Taylor K-2006 or submit a sample to a pool supply store for a full panel analysis.
Sequestering agents, such as those containing phosphonic acid, bind to dissolved metals and minerals in the water and keep them in solution rather than letting them deposit on tile. Add a sequestering agent monthly, especially after heavy rain or when refilling the pool.
Pro Tip: After any significant water addition, retest and adjust chemistry before the pool sits idle. Fresh tap water often has higher calcium hardness and pH than your pool’s existing water, and the imbalance accelerates scale formation on tiles.
Maintaining chemistry within these ranges is the single most effective long-term strategy for brightening pool tiles and keeping them that way.
DIY vs. professional pool tile restoration: which is right for you?
The decision between DIY and professional restoration comes down to damage severity, tile type, and how much time you are willing to invest.
| Factor | DIY Approach | Professional Service |
|---|---|---|
| Damage level | Light to moderate surface scale | Heavy scale, glaze wear, substrate failure |
| Tile type | Ceramic, porcelain | Glass tile, natural stone, mosaic |
| Cost | Low (materials only) | Higher upfront, longer-lasting result |
| Time investment | Several hours per session | One to two days, done correctly |
| Tools required | Brush, pumice, vinegar, baking soda | Glass bead blaster, epoxy, professional grout tools |
| Risk of damage | Low with correct technique | Minimal with experienced contractor |
Glass bead blasting is the professional standard for heavy calcium removal. It is fast, safe for ceramic, porcelain, and glass tiles, and restores tile to a near-new appearance in hours without damaging grout lines. This is not a DIY option. The equipment is specialized and the technique requires training.
For homeowners managing a single residential pool with moderate scale, DIY cleaning handles most situations. For property managers overseeing multiple pools, commercial properties, or pools with glass or natural stone tile, professional restoration delivers better results and reduces liability. The DIY repair guide for Florida pools covers step-by-step instructions for homeowners who want to handle minor repairs themselves.
The restoration versus replacement decision mirrors the logic used in other home surfaces. Just as roof restoration vs. replacement depends on substrate condition and damage extent, pool tile decisions hinge on whether the underlying bond layer is still sound.
Key takeaways
Restoring faded pool tiles requires accurate damage diagnosis, the right cleaning method for the buildup type, and consistent water chemistry control to prevent recurrence.
| Point | Details |
|---|---|
| Diagnose before cleaning | Identify surface scale vs. glaze wear vs. substrate failure before choosing a method. |
| Weekly brushing prevents hardening | Five minutes of waterline brushing weekly prevents calcium from bonding permanently to tile. |
| Use pool-grade materials for repairs | Standard adhesives and grout fail underwater. Use epoxy or thinset rated for submerged use. |
| Chemistry controls recurrence | Keep pH at 7.4 to 7.6 and alkalinity at 80 to 120 ppm to prevent calcium precipitation on tiles. |
| Know when to call a professional | Glass bead blasting, substrate repair, and widespread tile failure require professional tools and expertise. |
What most homeowners get wrong about tile restoration
After seeing hundreds of pools in Central Florida, the pattern is consistent. Homeowners clean the tile, the pool looks great for a few months, and then the scale comes back. They blame the cleaning product. The real problem is almost always the water chemistry or the substrate.
Calcium scale is a symptom. The cause is pH drift and hard water. If you clean the tile without fixing the chemistry, you are on a treadmill. The scale will return on the same schedule, every time.
The second mistake is ignoring hollow tiles. A tile that sounds hollow when tapped has already lost its bond to the substrate. Cleaning it makes it look better temporarily, but water is getting behind it. That water expands and contracts with temperature, and within a season or two, the tile cracks or pops off entirely. Fixing a hollow tile costs a fraction of what it costs to repair the substrate damage that follows if you wait.
The pools that hold up best over decades are not the ones that get the most aggressive cleaning. They are the ones with owners who test their water weekly, brush the waterline consistently, and address small problems before they become structural ones. That discipline matters more than any single product or technique. For a deeper look at what drives long-term tile and surface degradation, the reasons pools fade and how to prevent it is worth reading before your next maintenance cycle.
— Classicmarcite
Let Classic Marcite restore your pool’s tile and finish
If your pool tiles show widespread scale, glaze loss, or substrate damage that goes beyond what cleaning and spot repairs can fix, Classic Marcite has the experience to handle it correctly.

Classic Marcite has resurfaced over 100,000 pools across Central Florida since 1988, making it the largest Pebble Tec® applicator in the region. The team handles everything from targeted tile repairs to full interior resurfacing using materials built for Florida’s hard water and UV conditions. Whether you are in The Villages, Winter Park, or anywhere across the Orlando and Jacksonville areas, a free estimate puts a professional assessment in your hands with no commitment. Explore pool resurfacing in The Villages or Winter Park resurfacing services to see what a full restoration looks like.
FAQ
What causes pool tiles to fade?
Pool tile fading is most commonly caused by calcium scale deposits from hard water evaporation, algae growth, and glaze wear from prolonged chemical and UV exposure. In Florida, high calcium hardness in tap water accelerates this process significantly.
Can I restore faded pool tiles without draining the pool?
Light waterline scale can be cleaned without draining by using a nylon brush and a vinegar solution at the waterline. For heavy deposits or tile replacement, lowering the water level below the tile line gives better access and results.
How often should pool tiles be cleaned?
Weekly brushing along the waterline prevents calcium from hardening, and a deep cleaning every three to six months keeps tile surfaces clear of stubborn buildup. Pools in hard water areas like Central Florida may need more frequent attention.
When does tile fading require professional restoration?
Professional restoration is warranted when tiles are hollow-sounding, when scale is too thick for pumice or acid cleaners, or when glaze wear and substrate failure affect a large portion of the tile surface. Glass bead blasting is the professional standard for heavy calcium removal.
Does fixing pool chemistry stop tile fading?
Maintaining pH between 7.4 and 7.6 and total alkalinity between 80 and 120 ppm significantly reduces calcium precipitation on tiles. Chemistry control does not reverse existing damage but prevents recurrence after restoration.
