
TL;DR:
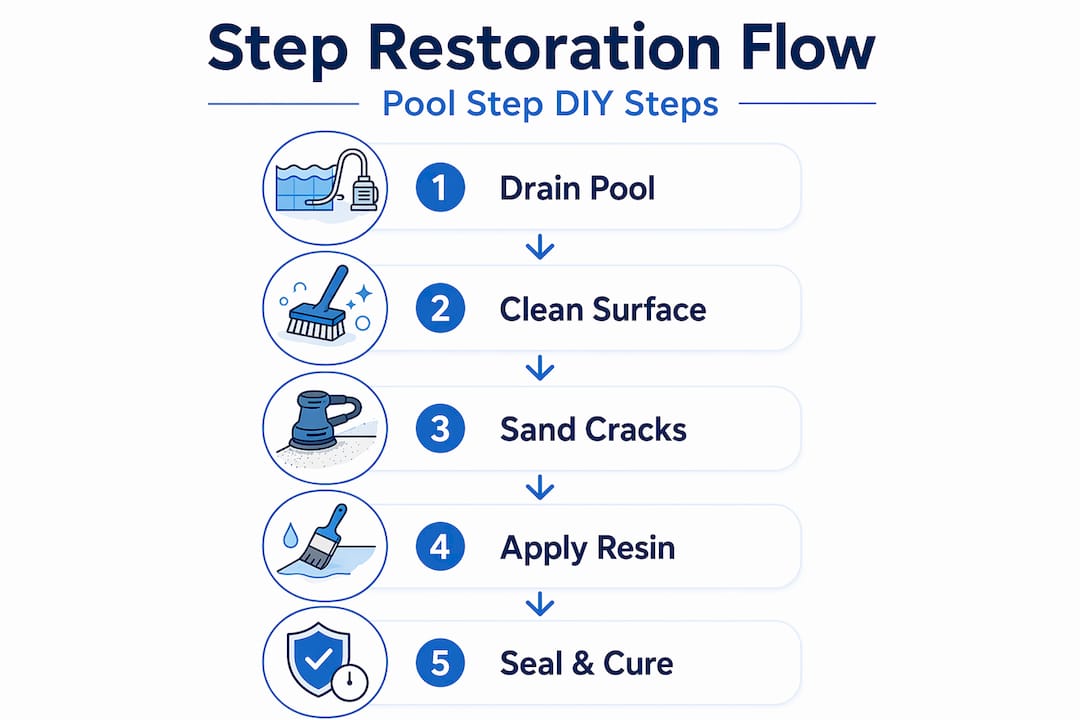
- Pool steps deteriorate faster than the rest of the pool due to constant water exposure and foot traffic, requiring timely repairs. Proper restoration involves assessing damage, thorough cleaning, careful surface preparation, precise application of resin, filler, and gel coat, followed by adequate curing and sealing. Regular inspections and patience during curing are essential to ensure long-lasting, professional-quality results and prevent costly future repairs.
Pool steps take a beating. Constant water exposure, chemical treatments, and foot traffic leave them cracked, stained, or structurally unstable long before the rest of your pool shows wear. Knowing how to restore pool steps before damage compounds is the difference between a quick weekend fix and an expensive professional overhaul. This guide walks you through every phase of pool step restoration: what to buy, how to prep the surface, how to execute the repair correctly, and how to keep your steps looking solid for years after.
Table of Contents
- Key takeaways
- How to restore pool steps: what you need before starting
- Preparation: draining, cleaning, and assessing damage
- Executing the repair: resin, cloth, filler, and gel coat
- Post-repair care: sealing, curing, and maintenance
- What I’ve learned from watching too many DIY repairs fail
- When professional restoration makes more sense
- FAQ
Key takeaways
| Point | Details |
|---|---|
| Assess damage type first | Differentiate cosmetic cracks from structural ones before buying materials or starting repairs. |
| Dry surface is non-negotiable | Wet surfaces kill adhesion, so never apply resin or filler until the area is completely dry. |
| Overfill cracks intentionally | Resin shrinks as it cures, so slightly overfilling prevents depressions that trap debris. |
| Match your gel coat color | Minor color mismatches are visible underwater, so test patches before full application. |
| Cure before you refill | Wait 24 to 48 hours after sealing before refilling the pool to avoid waterproofing failure. |
How to restore pool steps: what you need before starting
Good results start at the hardware store, not at the pool. Showing up to the repair without the right materials means stopping mid-job, which is worse than not starting at all.
Here is a reference table for the tools and materials you will need:
| Item | Recommended Type | Purpose |
|---|---|---|
| Fiberglass resin | Polyester or epoxy resin with catalyst | Structural repair and cloth bonding |
| Fiberglass cloth | 1.5 oz woven mat | Reinforcing cracked or delaminated areas |
| Marine-grade filler | 3M Marine Premium Filler | Filling cracks and voids smoothly |
| Sandpaper | 80, 120, 220, 400, 600 grit | Progressive surface smoothing |
| Gel coat | Color-matched polyester gel coat | Restoring surface finish and UV protection |
| Cleaning agents | Trisodium phosphate (TSP) or pool step cleaner | Removing algae, stains, and oils |
| Safety gear | Chemical-resistant gloves, N95 respirator, safety goggles | Protection from resin fumes and particles |
A few specifics worth noting. For safety equipment requirements, you need gloves rated for chemical exposure, not basic latex. Resin fumes accumulate fast in confined spaces, so a proper respirator is not optional. Eye protection matters especially during sanding, when fiberglass particles go airborne.
Pro Tip: When ordering gel coat, bring a chip of the original step finish to a marine supply store or pool supply specialist. Request tinting in small batches and apply a test patch on an inconspicuous area before committing. Color matching done carelessly is the most common reason DIY repairs look like DIY repairs.
Preparation: draining, cleaning, and assessing damage
This phase takes longer than the actual repair. Most DIY failures trace back to skipping or rushing preparation. Take your time here.
Lowering the water level
You need the damaged area fully exposed and at least 12 inches of dry working space around it. Lower water levels using a submersible pump or your pool’s drain valve. Do not let the pump run dry or sit unattended. Running a submersible pump too long can overheat it and damage the motor.
Cleaning the surface thoroughly
Before you touch a piece of sandpaper, the step surface must be chemically clean.
- Scrub away all algae, biofilm, and scale with TSP or a dedicated pool step cleaner
- Rinse thoroughly with fresh water, then let the surface air dry completely
- If staining persists after cleaning, a diluted muriatic acid wash removes mineral deposits
- Rinse again after any acid application and neutralize with baking soda solution before proceeding
Skipping the acid wash when staining is present causes adhesion failure later because the residue creates a barrier between the step surface and your repair materials.
Assessing the damage
Not all cracks are equal. Hairline surface cracks confined to the gel coat are cosmetic. Cracks that run through the laminate, flex when pressed, or show water seeping through are structural. Untreated structural cracks lead to leaks and foundation damage that multiply repair costs fast.
If you suspect a leak but are not sure where it originates, a dye test kit drops colored dye near the suspected crack. If the dye gets pulled into the crack, you have confirmed a leak source. This step takes five minutes and saves hours of guesswork.
Sanding before repairs
Start with 80-grit sandpaper to scuff and open up the damaged area. Work outward from the crack by three to four inches to create a proper bonding zone. Move to 120-grit for feathering the edges. Keep a wet/dry vacuum running nearby to manage fiberglass dust.
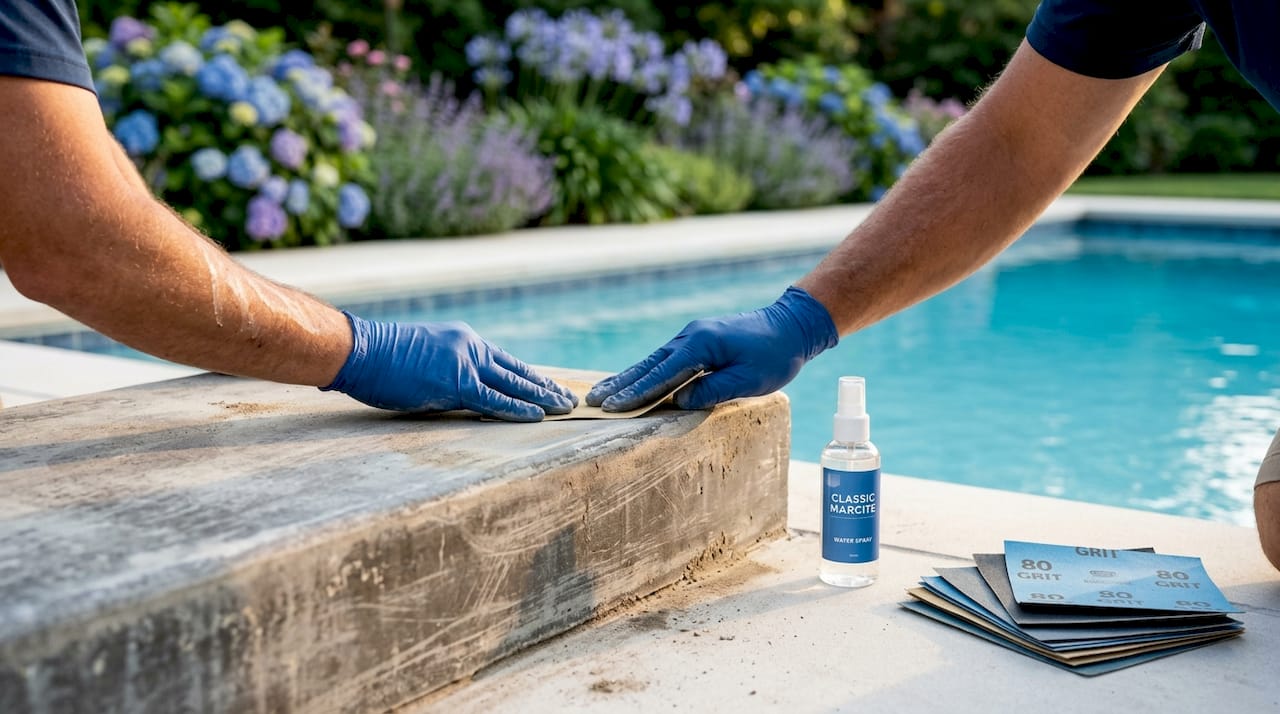
Pro Tip: Surface prep and drying are where patience pays off. Applying repairs on damp surfaces compromises adhesion completely. If you are unsure whether the surface is dry enough, use a heat lamp for 30 to 60 minutes before starting. The surface should feel warm and show no moisture when you press a dry paper towel against it.
Executing the repair: resin, cloth, filler, and gel coat
This is where the actual restoration happens. Work in sections and respect every cure window.
Mixing and applying catalyzed resin
Mix your polyester resin with the catalyst (MEKP peroxide) per the manufacturer’s ratio. Most formulas call for 1 to 2 percent catalyst by volume. Too much accelerates cure but makes the repair brittle. Too little leaves it tacky for hours.
Apply a thin resin coat to the sanded area. Lay fiberglass cloth over wet resin, then apply a second resin coat on top. Use a brush or roller to work out air bubbles. Layered resin application with proper curing between coats is what separates a repair that lasts five years from one that delaminates by next season.
Allow each layer to cure for two to four hours before adding the next. Do not rush this.
Filling cracks with marine-grade filler
Here is a comparison of common repair products:
| Product Type | Cost | Durability | Ease of Use |
|---|---|---|---|
| Polyester marine filler | Low | Moderate | Easy |
| Epoxy filler | Medium | High | Moderate |
| Two-part structural epoxy | High | Very High | Requires skill |
For most homeowners fixing cosmetic to moderate cracks, polyester marine filler works well. For structural cracks or areas with flex, two-part epoxy is the right call even at higher cost.
Apply filler with a plastic spreader. Slightly overfill the crack because curing shrinkage creates depressions if you fill flush. Once cured, sand back with 120-grit, then 220-grit to blend the patch seamlessly with the surrounding surface.
Key steps for a clean result:
- Work in thin passes rather than one thick fill
- Sand between passes to identify low spots
- Check for pinholes before moving to gel coat; fill them with a second pass of filler
Applying gel coat
Gel coat is the final protective and aesthetic layer. Thin it slightly with acetone if needed for spray application. For brush application, apply in multiple thin coats with light sanding between each using 400-grit wet-dry paper.
Pro Tip: Apply a minimum of three thin gel coat layers for good opacity and UV protection. Multiple thin layers with sanding between produce a harder, more uniform finish than one or two thick coats. Finish with 600-grit for a smooth, water-ready surface.
Wear your respirator during gel coat application. The styrene fumes are stronger than resin, and ventilation matters a lot here.
Post-repair care: sealing, curing, and maintenance
The repair is done, but the job is not. How you handle the next 48 hours determines how long the work holds.
Apply a marine-grade polyurethane sealant over the fully cured gel coat. This adds an extra layer of waterproofing and UV protection. Marine-grade sealants require a minimum of 24 to 48 hours to cure before water exposure. Do not shortcut this window.
Before refilling, run through this checklist:
- Confirm the gel coat is hard, not tacky, across the entire repair area
- Inspect all filled cracks for any visible pinholes or voids
- Apply sealant and allow full cure per manufacturer specs
- Test water chemistry before refilling: aim for pH 7.2 to 7.6, alkalinity 80 to 120 ppm
- After refilling, inspect annually during spring opening and after any significant chemical treatment
For ongoing pool step maintenance, add a step-specific inspection to your regular pool maintenance checklist. Look for new cracks, surface discoloration, or softness under the surface after each winter and after any heavy-use period. Catching problems at the surface level costs far less than addressing them once water infiltration has begun.
A well-restored and properly sealed step should last several years before needing attention again. The key is not ignoring small changes. A hairline crack you notice in March is a five-dollar fix. The same crack ignored through a Florida summer becomes a structural problem.
What I’ve learned from watching too many DIY repairs fail
I’ve seen homeowners execute every step in this guide correctly and still end up with a failed repair six months later. The culprit is almost always one of two things: impatience during surface prep or underestimating a structural crack.
Here’s my honest take. Most people treat curing times as suggestions. They feel the surface, it seems hard, so they move on. What they miss is that the interior of the laminate is still off-gassing and completing its chemical cure. That internal activity, if interrupted by water, pulls moisture into the repair and starts a delamination cycle. You will not see it for months. By the time you do, the repair has failed below the surface.
The other mistake I see constantly is skipping the dye test on suspected leaks. People see a crack and fill it. But if the actual leak source is a fitting nearby or a section of the step not directly visible, the repair does nothing. You have spent money and time on a cosmetic fix while the real problem continues unchecked.
My advice: do not guess. Test, dry, cure, and verify before moving to the next phase. If the damage covers more than a square foot, involves active flex in the laminate, or has visible delamination bubbles across the surface, call a professional. A botched structural repair on pool steps creates a safety hazard that costs far more to correct later.
— Classicmarcite
When professional restoration makes more sense

Some pool step damage goes beyond what a weekend repair kit can address. If your steps show widespread delamination, large structural voids, or complete surface degradation, professional resurfacing delivers results that hold up far longer than DIY patches.
Classicmarcite has resurfaced over 100,000 pools across Florida since 1988, including complete step restoration services for residential and commercial properties. Their team uses premium materials including Pebble Tec® and color-matched finishes that bond at a depth no surface kit can replicate. Whether your project is in Orlando, The Villages, or Winter Park, Classicmarcite offers free estimates and professional-grade results. Get your pool resurfacing estimate and find out what your steps actually need.
FAQ
How long does pool step restoration take?
Most DIY pool step restoration projects take two to three days when you account for proper drying, curing between layers, and the mandatory 24 to 48 hour wait before refilling.
Can you repair pool steps without draining the pool?
You need to lower the water at least 12 inches below the damaged area. Applying resin or filler to a wet or submerged surface causes adhesion failure, so full exposure and drying are required.
How do you know if a pool step crack is structural?
Press the crack gently. If it flexes, shows water seeping through, or has visible separation in the laminate beneath the surface, it is structural. A dye test kit confirms whether the crack is also an active leak.
What is the best material for fixing pool steps?
For structural repairs, two-part epoxy filler offers the best durability. For cosmetic cracks, polyester marine filler is easier to work with and more affordable. Both require a color-matched gel coat layer on top to seal and protect the finish.
How often should pool steps be inspected?
Inspect pool steps at least once a year, ideally during spring opening. Check for new cracks, surface softness, and discoloration after any heavy chemical treatment or winter season.