
TL;DR:
- Most pool leaks develop gradually from multiple small issues, not just evaporation, often going unnoticed until significant damage occurs.
- Early detection through tests like the bucket method and professional inspections can save homeowners thousands by preventing soil erosion, equipment failure, and costly repairs.
Most pool owners assume the water level drops because of evaporation. It’s a reasonable guess. But understanding how pool leaks happen reveals a different reality. 65% of pools develop a leak within 15 years, wasting an average of 15,000 gallons annually. That’s not evaporation. That’s a structural or plumbing problem hiding in plain sight, quietly running up your water bill and degrading your pool’s foundation. Knowing what causes pool leaks, how to spot the early signs, and when to act can save you thousands of dollars in repairs.
Table of Contents
- Key takeaways
- How pool leaks happen: the primary causes
- Evaporation vs. an actual leak
- What happens when you ignore a leak
- Finding and fixing pool leaks
- My honest take on how homeowners handle pool leaks
- How Classicmarcite helps protect your pool
- FAQ
Key takeaways
| Point | Details |
|---|---|
| Leaks are more common than you think | Most pools develop a leak well before the 20-year mark, often without obvious signs. |
| Evaporation has a measurable limit | Normal water loss is about 0.25 inch per day. Anything beyond 2 inches per week points to a leak. |
| Multiple causes work together | Aging materials, shifting soil, plumbing wear, and water chemistry failures often combine to create leaks. |
| Early detection saves money | Finding a leak early cuts repair costs significantly and prevents soil erosion and equipment damage. |
| DIY tests exist, but pros find what you can’t | The bucket test is a solid starting point, but underground leaks require professional tools to locate. |
How pool leaks happen: the primary causes
Leaks usually develop gradually from multiple small issues rather than a single sudden event. That’s what makes them so easy to miss. By the time you notice something is wrong, the problem has often been building for months.
Here are the most common causes:
- Aging pool surfaces and materials. Plaster, fiberglass, and vinyl liners all degrade over time. Plaster becomes porous and cracks. Vinyl develops small tears around fittings. Fiberglass shells can delaminate. Any of these surface failures creates a path for water to escape.
- Deteriorated gaskets, seals, and fittings. Aging seals and fittings around lights, skimmers, return jets, and drain covers are among the most overlooked sources of leaks. Rubber components harden and shrink over years of exposure to chlorine and UV light.
- Underground plumbing failures. Pipes buried beneath your deck and yard carry water between your pool, pump, and filter. These lines can crack from soil movement, freeze damage, or simple age. Because you can’t see them, they’re often the last cause homeowners consider.
- Soil movement and tree root intrusion. Florida’s sandy, shifting soils are particularly unforgiving. Ground movement puts stress on pool shells and plumbing connections. Tree roots actively seek water and can force their way into underground pipes, creating stress cracks that worsen over time.
- Equipment failures. Pumps, heaters, valves, and multiport fittings all have seals and unions that wear down. A slow drip at the equipment pad seems minor but can add up to hundreds of gallons lost per week.
- Construction defects. Poor bonding during original construction, improper curing of plaster, or substandard fittings can create weak points that fail years later.
Water chemistry plays a bigger role in what causes pool leaks than most owners realize. Imbalanced water accelerates corrosion and material degradation across every surface and fitting in your pool. Water that’s too acidic will eat away at plaster and metal fittings. Water that’s too alkaline causes scale buildup that stresses pipes. Staying within proper chemical ranges is one of the most cost-effective ways to extend your pool’s life.
Pro Tip: Check your pool’s pH, alkalinity, and calcium hardness monthly. Letting chemistry drift for even a few weeks creates conditions that speed up material breakdown at every vulnerable point.
Evaporation vs. an actual leak
This is where most homeowners get tripped up. Both evaporation and leaks cause your water level to drop, so they look identical from the outside. But pools losing more than 2 inches per week are almost certainly leaking. Normal evaporation runs about 0.25 inch per day, and even on hot Florida summer days, it rarely exceeds 1.5 inches in a week.
The bucket test is the cleanest way to separate the two:
- Fill a plastic bucket with pool water and set it on the first or second step of your pool so it sits at the same temperature as the surrounding water.
- Mark the water level inside the bucket and on the pool wall with a piece of tape or a grease pencil.
- Run the pool as you normally would for 24 to 48 hours, keeping the auto-fill system turned off.
- Compare the two water levels. If the pool lost significantly more water than the bucket, you likely have a leak.
- Repeat the test with the pump off to help determine whether the leak is in the plumbing lines or the shell itself.
Beyond the bucket test, look for these physical signs around your pool:
- Wet or soft ground near the equipment pad or pool return lines
- Cracks in the pool deck or coping that have appeared recently
- Tiles that are loose or falling off, which often signal shell movement
- Your auto-fill valve running more frequently than it used to
If your auto-fill system seems to run almost constantly, treat it the same as a warning light on your car’s dashboard. The system is masking a real water loss problem, not solving it.
Pro Tip: Turn off your auto-fill system for 24 hours before testing. Auto-fill masks leaks by continuously topping the pool off, making it nearly impossible to gauge actual water loss without disabling it first.
You can find a deeper breakdown of what to watch for on the pool surface itself by reviewing signs of pool surface damage, which pairs well with the bucket test observations.
What happens when you ignore a leak
The consequences stack up faster than most people expect. Homeowners often pay for leak water twice: once on the water bill, and again in the damage that the escaping water causes. Here’s what that damage looks like in practice:
- Soil erosion and structural shifting. Leaking water saturates the surrounding soil, washing away the material that supports your pool shell and deck. This leads to deck cracking, uneven surfaces, and in serious cases, movement of the pool shell itself.
- Equipment breakdown. Pumps running with low water levels work harder and can run dry, burning out motors and heating elements far ahead of schedule. A $200 repair can turn into a $1,500 pump replacement.
- Escalating chemical costs. Every gallon of water that leaves your pool takes the chemicals in it along. You end up adding more sanitizer, more pH adjuster, and more stabilizer just to keep up with the loss. It’s money going nowhere.
- Mold and moisture damage. Water migrating under your deck or into the equipment area creates conditions for mold growth, especially in Florida’s humid climate. Remediation adds a cost layer that has nothing to do with the pool itself.
- Higher repair complexity over time. Ignoring leaks results in escalating damage as small, fixable problems compound into expensive structural repairs. A surface crack caught early might cost a few hundred dollars to patch. That same crack, left alone for two seasons, can require partial replastering or deck reconstruction.
The straightforward math is this: the longer you wait, the more categories of damage accumulate simultaneously.
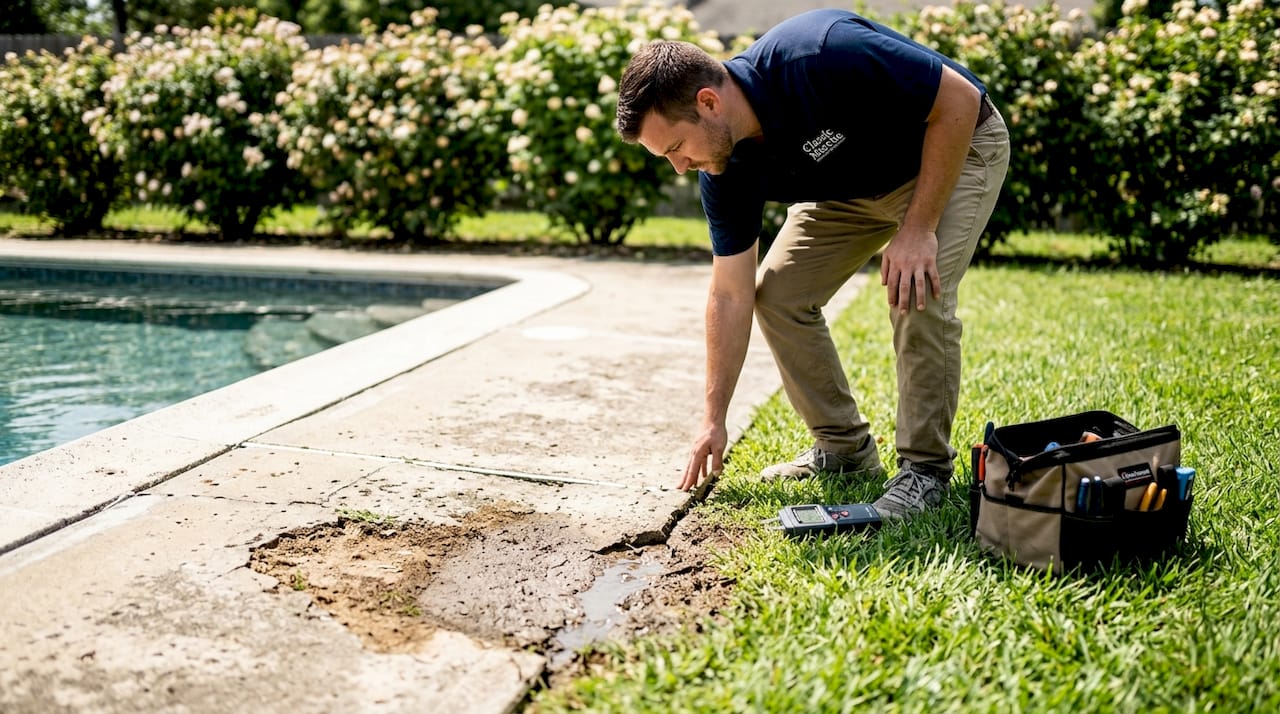
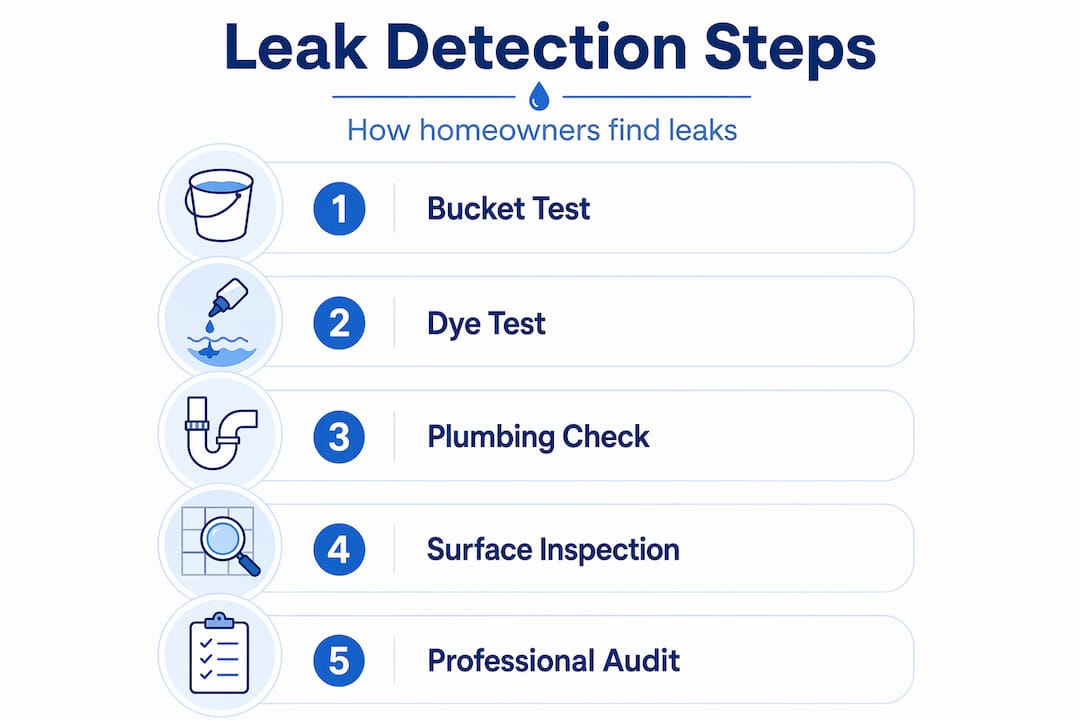
Finding and fixing pool leaks
Once you suspect a leak, you have a sequence of steps that moves from simple observation to professional diagnosis. Start with what you can see and do yourself, then bring in specialists for what requires tools.
- Visual inspection. Walk the entire perimeter of your pool and equipment pad. Look for wet spots on the ground, rust stains around fittings, efflorescence (white calcium deposits) on the shell, and any visible cracks in the plaster or tile grout.
- Dye testing. For suspected cracks or fitting leaks, a leak detection dye syringe lets you release a thin stream of colored dye near the suspect area. If it gets pulled into a crack or fitting gap, you’ve found a leak point. This is a widely used homeowner-accessible method.
- Pressure testing. A pool professional can cap your return and suction lines and pressurize them to check for underground leaks. A drop in pressure confirms a breach somewhere in the buried plumbing.
- Hydrostatic pressure testing. Used when the shell itself is suspect, this method tests whether groundwater pressure from below is forcing water in or allowing pool water to escape through the floor.
| Method | Who can do it | What it finds |
|---|---|---|
| Bucket test | Homeowner | Confirms leak exists |
| Dye testing | Homeowner or pro | Locates visible surface leaks |
| Pressure testing | Professional | Finds underground plumbing leaks |
| Hydrostatic test | Professional | Identifies shell and floor leaks |
Underground leaks are especially difficult to locate because water travels through soil and often surfaces far from where the actual breach is. Don’t assume the wet spot in your yard marks the leak source. That’s rarely true.
Pro Tip: Schedule a professional leak inspection annually, not just when you suspect a problem. Many leaks are found during routine checks before they grow into structural damage.
For Florida-specific guidance on detection and repair, the Florida pool leak workflow covers conditions unique to the region, including soil movement patterns and local plumbing standards.
My honest take on how homeowners handle pool leaks
I’ve seen the same pattern repeat itself more times than I can count. A homeowner notices the water level dropping, adds water, and moves on. They tell themselves it’s the heat. Maybe the kids are splashing a lot. Maybe the sprinklers hit the deck. The months pass, and by the time they call someone, the soil beneath the deck has been washing out for a year.
What I’ve learned is that the delay is never really about not knowing something is wrong. It’s about not wanting the repair bill. And that instinct always costs more in the long run. The leak that costs $400 to fix in April becomes a $3,000 deck and shell repair by October.
The other mistake I see constantly is owners who do the bucket test once, see borderline results, and decide they’re fine. Leaks are rarely dramatic. A pool losing 15,000 gallons a year is averaging only about 41 gallons a day. On a pool that holds 20,000 gallons, that’s almost invisible day to day. You have to be methodical about it.
My advice: treat your pool like any other major system in your home. You wouldn’t skip annual HVAC service and wait until the unit fails in July. The same logic applies here. A yearly inspection from someone who knows what they’re looking at pays for itself the first time it catches something early.
— Classicmarcite
How Classicmarcite helps protect your pool

When a leak stems from a failing surface, aging plaster, or cracked shell material, detection is only half the job. The repair has to hold. Classicmarcite has resurfaced more than 100,000 pools across Orlando and Jacksonville since 1988, and a large portion of that work starts with a leak that a homeowner had been watching for too long.
As the largest Pebble Tec® applicator in Central Florida, Classicmarcite brings both diagnostic experience and premium materials to every project. Whether your pool needs targeted pool repair services or a full resurfacing with materials built to handle Florida’s heat, humidity, and chemical demands, the team can assess what you’re dealing with and give you a clear path forward.
If you’re in The Villages or surrounding areas, pool resurfacing in The Villages is a direct service option worth exploring. Proactive resurfacing addresses the surface-level vulnerabilities that lead to leaks before they become structural problems. Request a free estimate and get a professional set of eyes on your pool before the next season.
FAQ
What are the most common causes of pool leaks?
The most common causes include deteriorated seals and fittings around skimmers, lights, and returns; cracks in the pool shell or plaster; underground plumbing failures; and soil movement that stresses pool structures. Water chemistry imbalances can accelerate all of these.
How do I know if my pool is leaking or just evaporating?
Run the bucket test: place a bucket of water on your pool step, mark both levels, and compare after 24 to 48 hours. If the pool loses significantly more water than the bucket, you have a leak. Losing more than 2 inches per week is a clear indicator.
Can a pool leak cause damage beyond water loss?
Yes. Leaking water erodes the soil beneath your deck and pool shell, leading to cracking, settling, and structural movement. It also forces your pump to work harder with lower water levels, which shortens equipment life considerably.
How do professionals locate underground pool leaks?
Professionals use pressure testing on plumbing lines and hydrostatic tests on the shell to pinpoint underground leaks. Dye testing and electronic listening devices can also locate leaks that aren’t visible from the surface.
How often should I have my pool inspected for leaks?
Annual professional inspections are the standard recommendation. Florida pools face additional stress from sandy soil, heavy rain, and year-round use, making regular monitoring and a yearly check especially worthwhile.